 Project Duck News
Tanking is an important part of 8-man raids in Project Duck, but some people have a hard time figuring out how to be an effective tank. This guide hopefully should help with that.
What is tanking in DN?
Tanking in DN comes down to 5 major "tasks":
- Manage or manipulate the boss
- Shield allies from incoming damage
Reduce the damage that the boss dealsThis is no longer a mechanic- Remove boss enrage
- Optimize boss combat
Tasks 2, 3, and 4 are pretty straightforward (just press the right skill button!) but 1 and 5 are the ones that require the most practice and knowledge. This guide will mostly cover those two tasks, with a little bit on the rest.
Boss Management ("Aggro")
Monsters will pick a target player (or allied summon) and focus its attacks towards that target. Usually, you will want that target to be you, the tank. Generally speaking, most DPS classes don't appreciate "having aggro" since it forces them to dodge the bulk of the boss's attacks which means they cannot DPS as much and they will take damage or die if they fail to dodge.
This is where your [Provoke] skill and other aggro-generating skills come into play. [Provoke] applies a debuff to the boss that forces the boss to aggro you for a duration of time.
Note: Some bosses are immune to [Provoke], and most bosses have skills that forcibly reset or randomize aggro. We'll cover these later
Also note: All 3 tanks have a skill that is a "secondary" provoke. This secondary provoke has lower priority than [Provoke] but can be used to maintain aggro as well. Guardian has [Armor Break], Destroyer has [Punishing Swing], and Defensio has [Taunting Blow]
For basic tanking, you basically want to have 100% uptime on [Provoke], so use it off cooldown. Now that you have the boss's attention, you will want to direct the boss in a way that minimizes the attacks that your party will need to deal with. For most bosses, this means pointing the boss in a direction and "walking" the boss around the arena in a predictable fashion. You will generally want to avoid sudden sharp turns or trapping yourself against a wall or into a corner, so this usually means walking the boss around in a slow circle. Your party will fight the boss from the sides or back (depending on if the boss has rear attacks e.g. tail swipe) and follow along.
As a tank, you do need to be aware of certain "special" attacks that involve you needing to directly interact with the boss, "walk" the boss, or preemptively position and point the boss to prevent your party from eating shit. This mostly comes with learning the raid, but you probably don't pay it much attention when you're playing as a DPS (unless you eat shit from it). One good way to know how to position as a tank is to put yourself in the mind of a DPS - where would you want the boss to be and how do you want the boss to behave to maximize your DPS?
Unfortunately, things aren't that easy. Most bosses have skills that will reset and randomize aggro to someone else. You'll need to re-establish aggro afterwards and bring the boss back under your control. Part of becoming an effective tank is knowing which skills reset aggro, so you're instantly ready to provoke the boss. There are also bosses (e.g. Ice Dragon boss 2) that are immune to provoke. For those bosses, your focus is to maintain shielding, damage reduction, and DPSing.
Shielding, Damage Reduction, Boss Enraging
Each tank has a health bubble for you and your party and a skill that removes certain kinds of buffs from bosses.
Obviously, you'll want to keep your party bubbled as much as possible. Literally press the button, although keep in mind the range isn't that big.
For removing buffs from the boss, some bosses have an "enrage" mechanic where the boss will gain a buff that greatly increases the damage it deals. Some examples are:
- Rune Dragon boss 1 Managarm: he rises up on his hind legs and stomps, with a system message saying "Managarm is enraged". Buff icon is green, just debuff it off once it appears
- Black Dragon boss 3: Boss drinks a potion and beats his chest, system text about unleashing his inner power or something like that. Same as above
- Black Dragon boss 4: Boss does some hand motions, boss gets a red tint, system text about getting enraged. Same as above
It is VERY IMPORTANT that you remove these damage/enrage buffs off of the boss, because in most cases when they are enraged they will oneshot most players.
Do note that there are some boss buffs that cannot be wiped, but it isn't a bad thing to try it anyway. Just remember what the result is or ask more experienced players.
Boss Optimization
This is where you utilize your management over the boss to manipulate the boss into doing certain things (or a greater chance of doing certain things) that benefits you and your party. Most bosses have skills with varying minimum and maximum distances to trigger them, so the distance that you stand from the boss can affect which skills the boss will use. This varies from boss to boss, so you'll need to pay close attention to the boss as you play and figure out what ranges correspond to what skills (or even the boss just walking).
You can also use boss positioning and orientation to your advantage in some cases, if you know certain skills are coming up. Two big examples are the tail swipes on most dragons and the frontal breath on most dragons. In Ice Dragon Nest, the Ice Dragon has a tail swipe that is very dangerous for the party as it deals 90%+ HP damage and can oneshot if it hits multiple times, on top of draining all MP. A skilled tank will intentionally cause the dragon to use tail swipe at regular intervals while the dragon is under control so that the party doesn't have to worry about a surprise turn into tail swipe.
Boss Specific Tips
Ice Dragon Nest Vahrcore
Ice Dragon Guy (Boss 3)
Try to keep the boss near the edges of the map, and when frontal cone is almost off cooldown, try to point the boss so that the cone goes into the wall (instead of towards your team)
Ice Dragon (Boss 4)
Walk the dragon around the edge of the map
Rune Dragon Nest
Managarm (Boss 1)
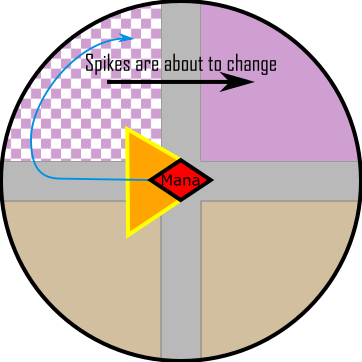
- Try to keep the boss in the sector that's clockwise from the current spike sector
- Remember that the first spike sector is always going to be 11 o'clock (and 1 o'clock after 50%), so after a spike reset try to take the boss to 7 o'clock
- Focus breath ("Managarm focuses a fire breath on a party member" or something like that) debuffs on the first slam down and at the very end. Dodge the first hit, then you can facetank (Destroyer), block/vanguard (Guardian), or iframe (Defensio) the breath, or just stay out of range of the hit area while walking the boss. Again, keep in mind where the spike sectors are and use this forced aggro walk to position the boss in a favorable spot
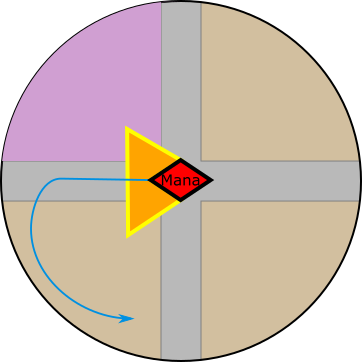
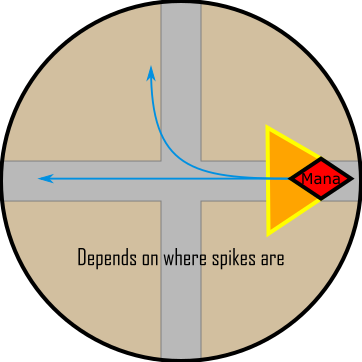
- Be wary of where you stand once you have the boss in a spot - try to position yourself so that if the boss were to leap at you or charge through you, the boss ends up in an acceptable position. Always draw a line in your head starting at the boss and passing through your current position, and if that line keeps going into a bad spot (e.g. spike sector) then you need to adjust your position
- Sometimes the boss ends up in spikes and you're trying to get the boss to come out. Do not stand too far away from the boss or it'll use ranged attacks, but don't stand so close that the boss only uses melee attacks. There's a sweet spot where the boss will prefer to walk or leap at you instead.
- Debuff the enrage, there's a system text and a green buff on the boss's buff bar when it happens
Hrungnir (Boss 2)
- This boss can only be provoked until he does the unleash darkness mechanic
- Focus on damage reduction
- There's nothing to debuff
- For clone mech in HC, prefer to use your soft provoke (Armor Break/Punishing Swing/Taunting Blow), since its harder to mess up and accidentally provoke the wrong clone. Each half of the party needs to establish aggro on their respective clone, so for the clone that you're at, you'll want to keep control of it. When it comes time to swap, each side should switch places so that the clones follow.
- In the event that control is lost over the clones, take advantage of the fact that your soft provoke is affected by the clone iframing and your hard provoke ignores iframes. If they're stuck together, use your soft provoke to grab the one that isn't invulnerable and separate it from the invulnerable one.
Volva (Boss 3)
- This boss is provokable but has so many random aggro and position resets (and untargeted AoE mechs) that you mostly will focus on damage reduction
- There's nothing to debuff
- It is possible to make it more likely that you will get the mark for machine gun mech, but not by much. This will naturally happen if you keep provoke on the boss.
Rune Dragon (Boss 4)
- Phase 1 there's nothing you need to do until its time to DPS the dragon after escorting the ball. Decide between you and your healer who is going to tank the 3 big minions at the end of the hallway, whoever does it just needs to hit them to get their aggro and keep them away from the dragon
- Phase 2 is similar to boss 3, there's some management you can do with aggro to more likely proc certain skills. Best outcome is procing frontal breath since that's a free DPS period, next is regularly procing tail swipe for more free DPS time.
- There's nothing to debuff
Black Dragon Nest Time Attack
Burpy (Boss 1)
- This boss has wildly random aggro, so just focus on damage reduction and DPS
Ungatha (Boss 2)
- This boss has a few random aggro mechanics, but for the most part you can manage it
- You DEFINITELY want to make sure your party has bubble for stomp. When you see stomp, pop bubble and then dodge/parry/facetank (destro lol) the stomp
Punisher (Boss 3)
- For phase 1, keep the boss on the centerline of the cannon while your team deals with the energy
- Try to tank the boss up and down the centerline instead of across it, this helps significantly with the triple jump mechanic since the boss will jump down the line instead of out of the line

- This boss takes aggro, so you'll want to point the boss away from the team (otherwise they'll find themselves yanked by a chain or chopped up)
- There is an enrage mechanic after 50%, the boss will drink a potion and a system message will appear with a green buff on the boss's buff bar. Debuff it
Golem (Boss 4)
- Being a stationary boss there really isn't too much you can do here aggro-wise
- Usually the healer, tank, or other support will take the ice devastation ball
- There is an enrage mechanic after 50%, the boss will raise its arms in the air and wave them a bit and a system message will appear with a green buff on the boss's buff bar. Debuff it
Black Dragon Phase 1
- If you're not practiced at handling phase 1, ask your team to go slow (1 wave at a time).
- Your job as the tank is to lure the small mobs into the Black Dragon's long breath. You need to get the aggro of all the small mobs and hold them in roughly one area so that they're away from the team and fairly grouped together
- Once the dragon starts channeling the long breath, you need to make sure the mobs get hit by the breath by baiting them into it (without you yourself being in the breath when the dragon finally fires)
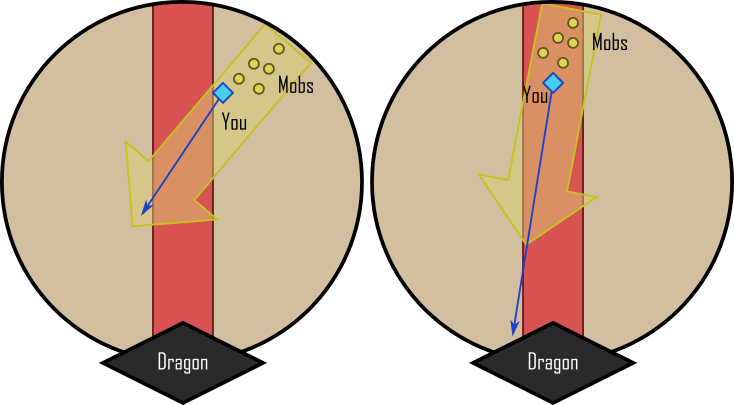
- Once you get more experienced, you can do multiple waves of small mobs at the same time and kill all of them with the same breath
- If you fail to lure all of the mobs into the breath, don't panic. Let your team know that you missed (they also should be keeping an eye out anyway) and wait for the next breath
- Each of the mob types do different things, but the ones to worry about are the ice casters (they can freeze you and getting hit by their freeze will drop your mana to 0) and the punishers (they can chain-pull you, knock you down, they do a tornado skill that has high knockback). Make full use of your defensive capabilities and dodges to avoid getting beat up (or trapped, you especially don't want to be trapped in the breath)
- For phase 2, DPS with everyone else
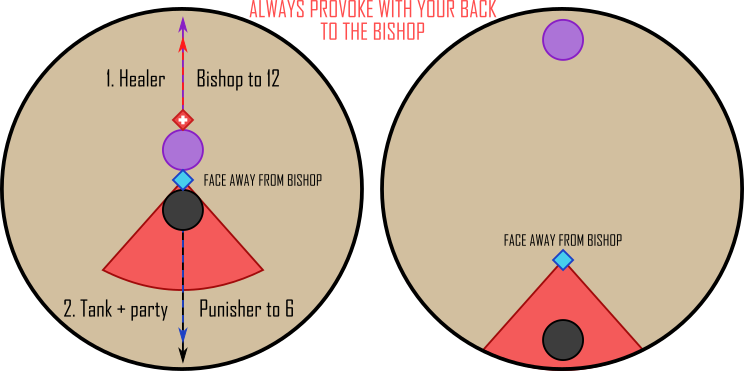
- For phase 3, you will help the party manage the Punisher. The healer should take the Bishop (just hit the Bishop once and run to 12). Then, when the Punisher spawns, stand WITH YOUR BACK TO THE BISHOP, provoke the Punisher, and run to 6. DO NOT PROVOKE TOWARDS THE BISHOP EVER.
- Phase 4 is the same as Phase 2 except there's an Endure that most parties expect, see below
- Boss 5 phase 4: stack mark, can be paired with Immortality