 Project Duck News
Introduction
Looking for the general guide? Click here
Settling In
- Head to Zeke and class change to your desired specialization. Beside him, you can get skill crests from Priestess of Darkness Mocha.
- Use your Duckling's Starter Bag and equip or use all the items.
- Make sure to create a proper skill build, as Project Duck does NOT have infinite SP. Every class has SP limits. Check out our Class Guides to see if we have a guide published for your desired class.
- Open your character status menu (default [P]). Look at your Main Stat to determine what stats you should be prioritizing
Understanding Our Custom Changes
Project Flow
Project Flow is a series of custom PvE changes to skills that overhaul gameplay for classes. This process smooths out the imperfections of Dragon Nest and are meant to provide the most satisfying gameplay experience. Here are some examples of Project Flow changes that we have made:
- Removed Camera-lock
- Reduced skill end lag/lockout
- Faster animation/cast speed
- Faster input reading
- Seamless transition between chain skills
Party-size Scaling Buffs
Some nests and all dungeons adjust monster difficulty based on the number of players in your party. You can check whether or not this is the case by looking for this icon on the stage select screen, or by reading the stage information text which will mention party size adjustment.
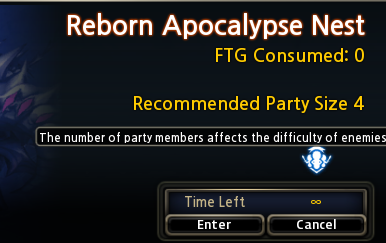
Generally speaking, the more players there are, the tankier the enemies will be, but it is often better to have more players since the monsters gain less HP with each party member (e.g. 2 players may double the enemy HP, but 4 players will only increase HP by 3.2x)
Dynamic Balance
Certain classes may receive a dynamic balancing buff or nerf. We use this system to apply class balancing changes in PvE live before we conduct maintenance or patch to apply those changes directly into the game.
Dynamic balance can change at any time and is not usually announced, nor is the player shown any indication that it has been applied.
Class Balancing
We implement class balancing changes and reworks as we see fit. You may suggest or request changes, but do not be surprised or disheartened when/if we give a rebuttal or do not implement the changes you suggested. We strive to make the game as fair and evenly paced as possible for all players regardless of the class.
Most of the classes in Project Duck have been overhauled and/or reworked. Do not expect your class to play the same as it does on official servers.
If you’re looking for second awakening, third awakening, and/or dragon jade skills, you won’t find them in the same way that you’d see them in official servers. We implement those special skills as we see fit into classes directly through our reworks.
Consult patch notes for changes to your classes.
Class Reworks
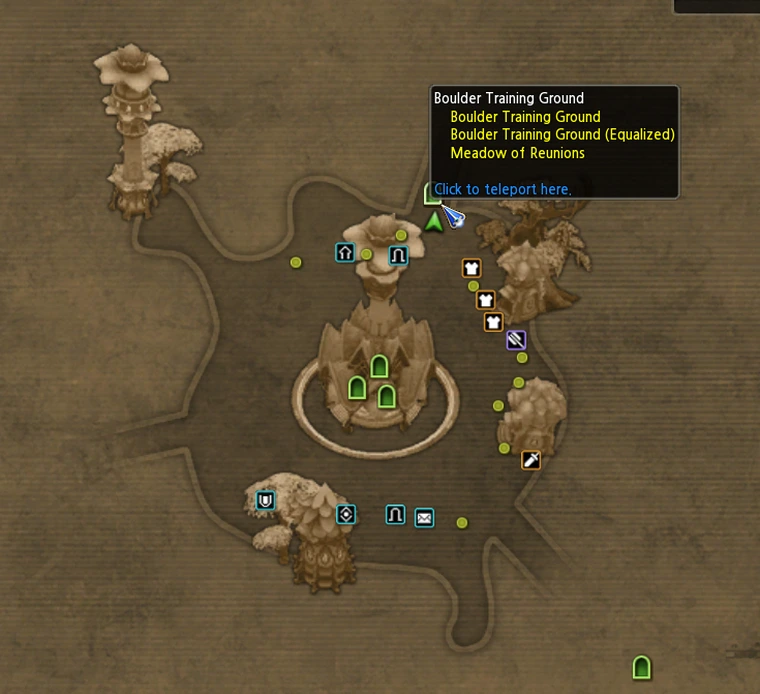
Many of the classes at Project Duck have been reworked in some way - some minorly, some majorly. Please spend some time reading your skill tooltips, read your class guide (if available), and try playing them in [Boulder Training Ground].
Consult patch notes for changes to your classes.
Gearing Up
Settling In
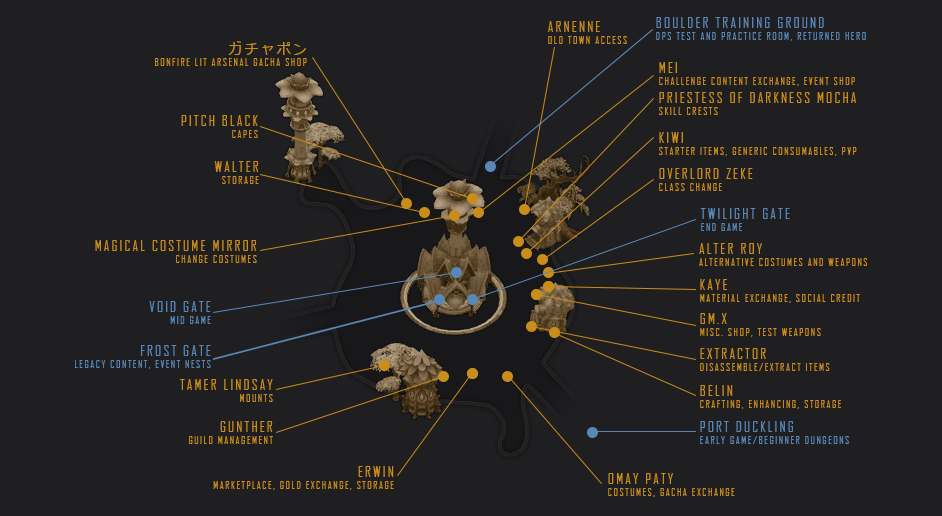
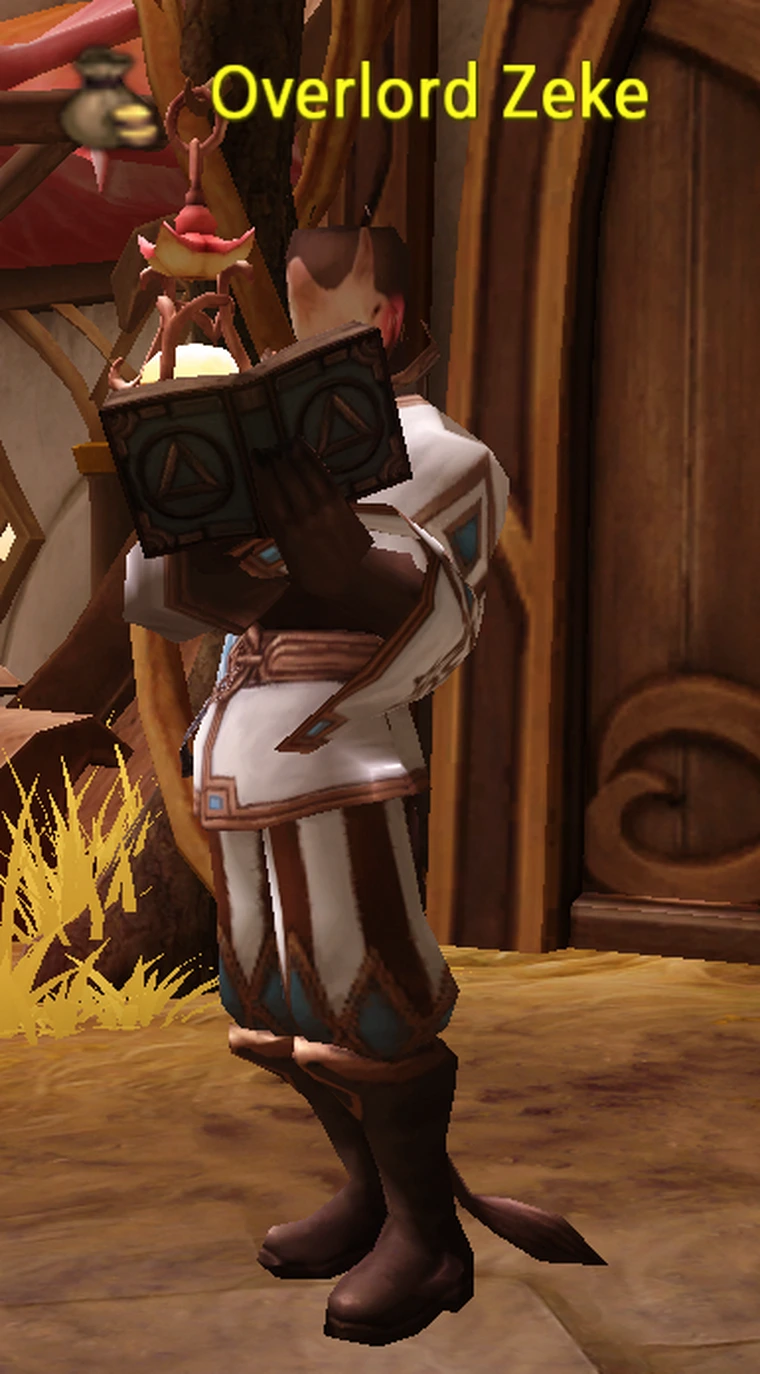
- When you first load into the game and create your character, head to Overlord Zeke, located on the East side of town. This is where you pick the class you wish to play. Please note, Zeke will only allow you to pick a class once, however, we provide class change scrolls for free which will allow you to freely change to a new class.
- You will be gifted with 100QC (shop currency), which you can use to buy all sorts of fun costumes and cosmetics including wings, tails, and decals. Simply press F11 and click the 1QC Costume tab.
- Use your Duckling’s Starter Bag and equip everything that you can. This bag contains all manner of useful things such as a costume, a pet, inventory expansions, and many more items you will use across your journey. A very important thing to note is that some of the equipment will provide you with much needed stats, which the early dungeons take into account when trying to clear.
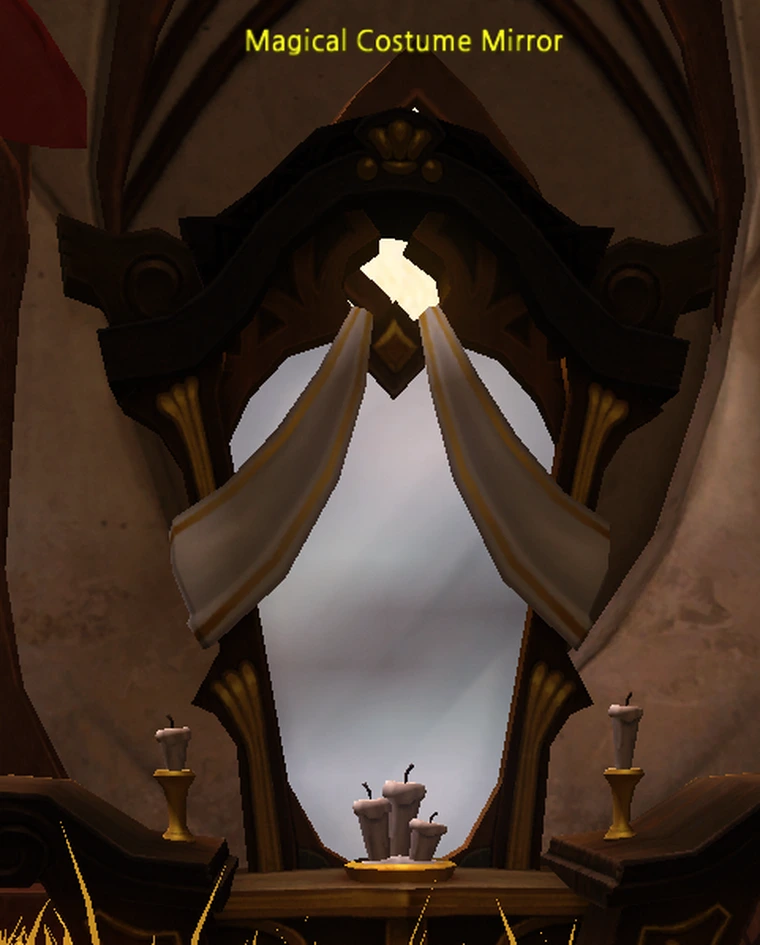
- Rune Amplifiers are your costume pieces, each one providing you with a ton of stats, movement speed, all manners of buffs. our Rune Amplifier costume can also be converted to look like the costume you picked from the F11 shop. Head on over to the Magical Costume Mirror, put on the outfit your choice, then click “Convert”
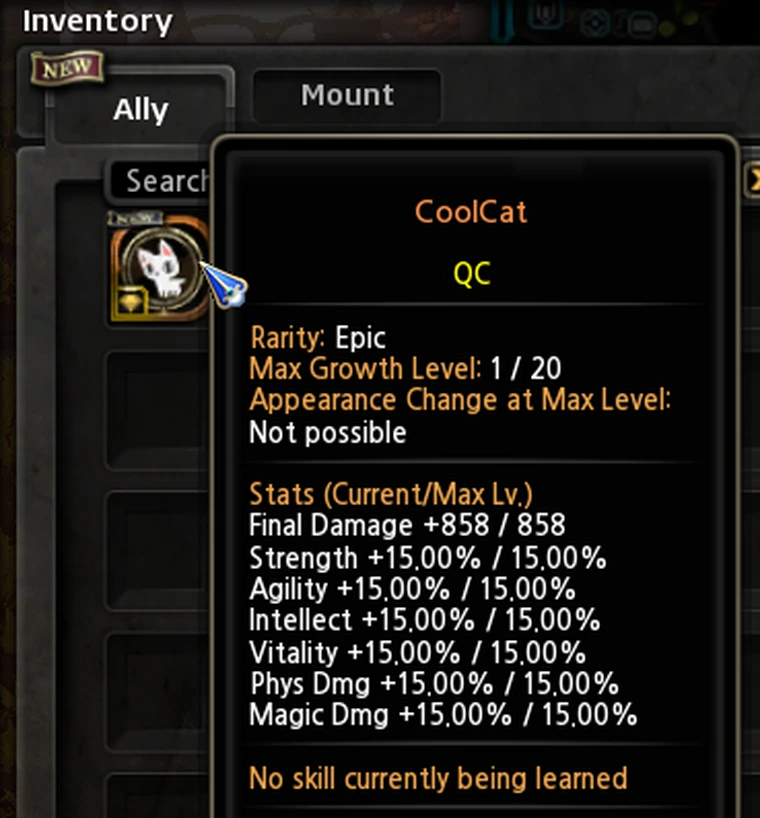
- You NEED to have these equipped no matter what. It will also provide you with a pet (a cat). Your pet also gives you a major jump in stats, so make sure to name it and summon it before going into any form of content.
- Allocate your skill points. Project Duck does NOT have infinite SP, so it is highly recommended to check out our posted class guides to see if we have a guide for your desired class. While we do provide ways to reset your SP, it can be annoying to constantly have to reset all your points because you made a few mistakes. Better to be prepared than to guess.
- Once your skill points are all set, head to Priestess of Darkness Mocha. She will provide you with skill crests. These crests directly affect the chosen skill by giving it bonus effects, such as more damage, faster action speed, lower cooldown, etc. Grab 7 skills of your choice and equip those.

Early Game/First Dungeons
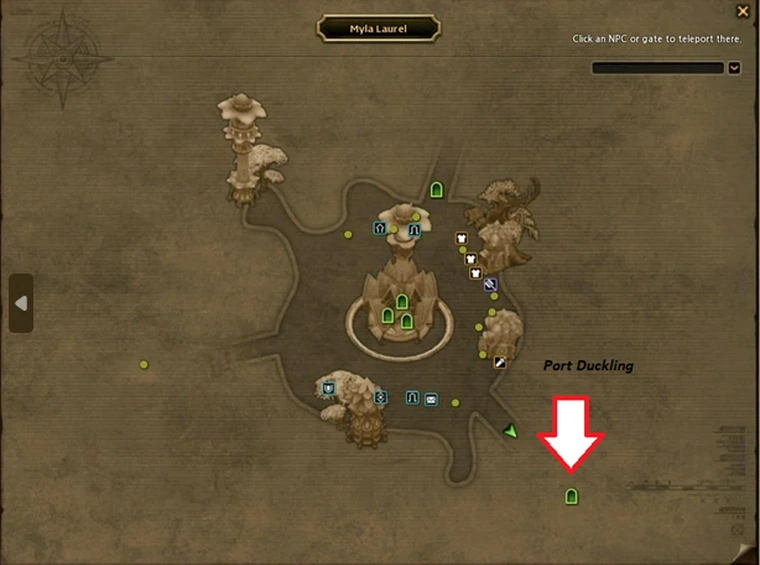
- Head to [Port Duckling] located on the southeast side of town. This portal will contain the 5 starter dungeons to begin the gearing process.
- Each dungeon will teach you some fundamentals that will be useful in content later on, so learning and memorizing these are highly recommended (examples being how to time your jumps to avoid a stomp, how and when to rebuff yourself and your allies, how to hide inside of a shield to avoid a large attack, and more. It won’t go over everything, but it’ll give you a rough understanding of certain encounters.
Portal 1: Willow Forest (Wooded Krag Hollow)
- This will be your very first dungeon. This dungeon is equalized, meaning that equipment and stats do not matter here. You can go in with nothing on and you’ll be fine. This dungeon also scales with your party size, so feel free to bring up to 3 friends in with you to enjoy the game together. When you fight the boss, you’ll be buff-wiped after dealing a certain amount of damage to it. This encounter will teach you to rebuff you and your allies as you won’t be able to continue the fight until you do so. All of the bosses in Port Duckling teach you a core mechanic of the game and the boss itself will be invulnerable until everyone in the party has done the mechanic properly. Focus on that before trying to deal more damage to the boss.
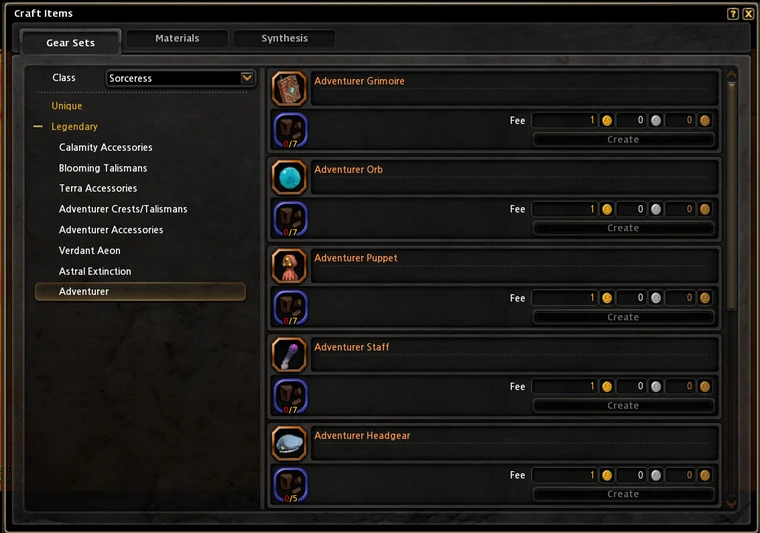
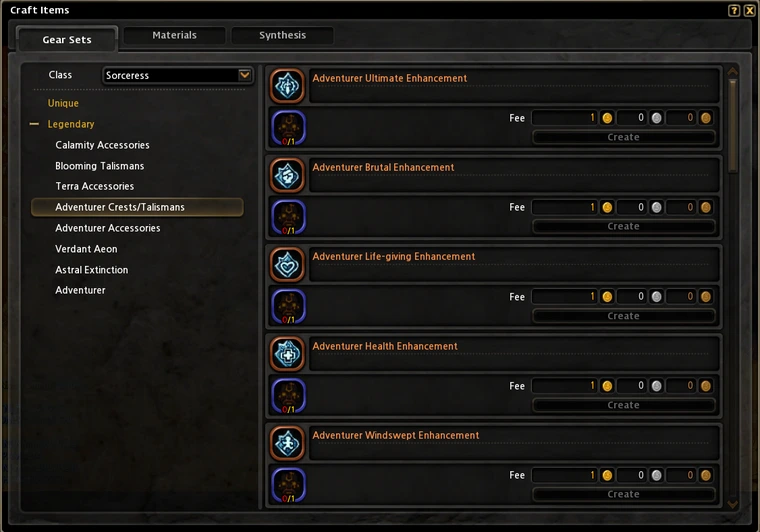
- By completing the dungeon and looting the chest, you will be rewarded with a Hunk of Junk. By extracting this, you will then gain Priceless Junk, which you will use to craft your first set of gear, the Adventurer Set. This includes all 5 pieces of armor, as well as your 2 weapons (Both Main and Off-hand). To craft the pieces, head to town and go East to Belin, the blacksmith. Click Craft Items, then click Adventurer on the left tab under Gear Sets. Craft all of your armor. Make sure you craft the right weapon (depends on your class). If you accidentally created the wrong weapon, you can always go back to Wooded Krag Hollow to obtain more materials to craft the right one.
Portal 2: Mountain Ridge (Rocky Mountain Pass)
- This dungeon is not equalized, so have your newly crafted gear equipped and ready to go. However, it does scale with your party size (meaning it will give you that nice damage buffs the fewer people are in the party just like the first dungeon).
- This dungeon will teach you stomp mechanics. The floor will glow red when the boss jumps into the air, and you must jump before he lands to avoid getting hit. You can also dodge by [Tumbling] or using a skill that makes you invulnerable. This mechanic will continue to happen until everyone in the party successfully dodges the stomp at the same time.
- The chest for completing this dungeon will provide you with Topaz Fragments, which you can use to upgrade your gear to +5 (max level of equipment is +20). To upgrade the gear, head to Belin again, click “Enhance Items”, then “Enhance Equipment”. Simply right-click the piece of gear you wish to upgrade, then click “Enhancement” at the bottom.
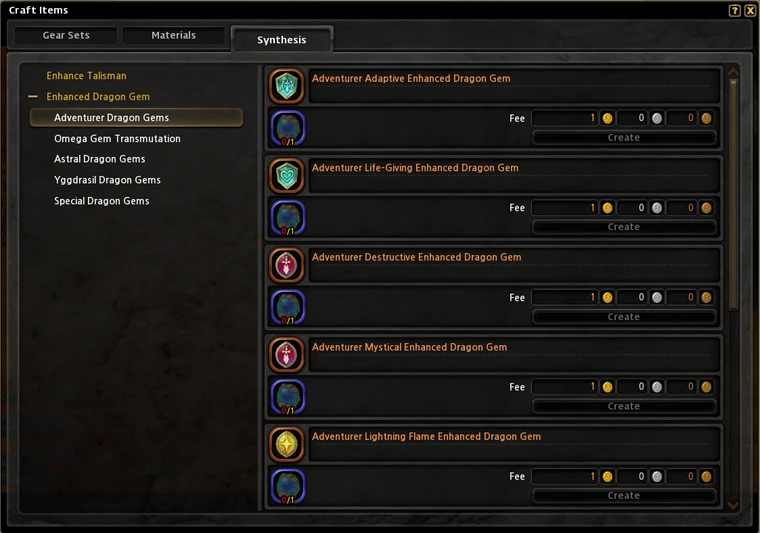
- You will also be rewarded with Shiny Pebbles, which are used to create Dragon Gems. These gems are put into your gear to provide you with bonus stats. They are incredibly important so don’t forget to put them on. To craft the gems, head to Belin again, click Craft Items, click Synthesis at the top, and you should see Adventurer Dragon Gems. To equip the gems, simply Shift + Right Click the piece of gear, then right-click the gem to insert it into the slot.
IMPORTANT INFO ABOUT GEMS
There are different variants of gems that work for different pieces of gear and serve a multitude of purposes.
- Defensive Gems (Blocky-shaped) go into your armor, necklace, and earrings (you will obtain accessories later). Generally, you’ll want to wear one adaptive gem and one life-giving gem in all of your armor pieces (helmet, chest, legs, glove, shoes).
- Adaptive Gems automatically grant you your main stat (examples: Destroyers will get Strength, Snipers will get Agility, and Pyromancers will get Intellect). So, if you swap to another character or class that uses a different stat, the gem will automatically change the stat given to match the new class. You will want to craft 9 Adaptive Gems total (2 of these will be put on your necklace/earrings later in the guide. The other 7 will be put on armors and weapons, 1 per piece).
- Life-Giving Gems provide your character with HP. Nice, short, and simple. I mean, who doesn’t like more HP, right? You’ll want to craft 5 of these to put on your armor. If you feel like you have trouble surviving, you can also wear additional Life-Giving Gems on your necklace, earrings, or even your weapons (replacing your Adaptive Gems). However, this will decrease your damage output pretty significantly.
- Attack Gems (oval-shaped) go into your weapons and rings (you will obtain accessories later)
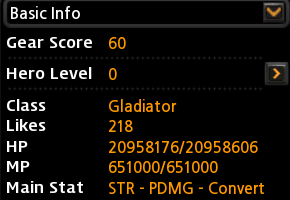
- Conversion Gems serve a unique purpose. Some classes do not have an innate element type. Conversion gems add an element to your character if your class doesn’t have an innate element. You must have one of these gems on your main-hand weapon if you don’t have an innate element (it doesn’t matter which element you pick). If you don’t know if you are a conversion class or not, press P to open up your stat page. Under “Main Stat”, it will say “Convert” if you need to wear a conversion gem.
- Elemental Gems grant elemental attack. Elemental attack works like a multiplier on top of your PDMG or MDMG. If you’re a conversion class, you should wear a conversion gem on your main-hand weapon, and elemental gems on both of your rings and off-hand weapon.
- Destructive/Mystical Gems provide your character with bonuses to their preferred damage type. These gems are only used for classes that have an innate element. To view what damage type your class is, press P, and at the top you should see Main Stat. That line tells you what your targeted damage type is; PDMG for physical (Destructive), MDMG for magical (Mystical). Slot in the right gem depending on your type.
Portal 3: Ornery Peaks (Goblin Tribe Garrison)
- This dungeon teaches you how to dodge wide-range attacks. Similar to the boss from Rocky Mountain Pass, the floor will glow red, warning you the attack is coming. To avoid the attack, instead of jumping, you’ll need to Tumble through the attack (Shift + W/A/S/D). This may take some time to master, but it’s a vital skill that will save you from countless situations in the future.
WHAT’S AN IFRAME?
Dodging an attack using a skill is known as iframing (performing an action that makes you invulnerable to most forms of damage). Many classes also have skills that are considered iframes you can utilize as well. It would be a good idea to head to the Boulder Training Ground (BTG) located in the North portal in town to test different skills and see if they can be used as an iframe. While in the boulder training, press Alt+D to open your DPS meter. At the bottom, you’ll see a button called “Log”. While that is open, use your skills one by one. If a white line appears at the top when using the skill, that means it is an iframe and can be used to avoid attacks just like Tumble. No white line = not an iframe, so you can still be hit or even knocked out of the skill entirely.
- This dungeon will reward you with Ruby Fragments, which will allow you to upgrade your gear to +10.
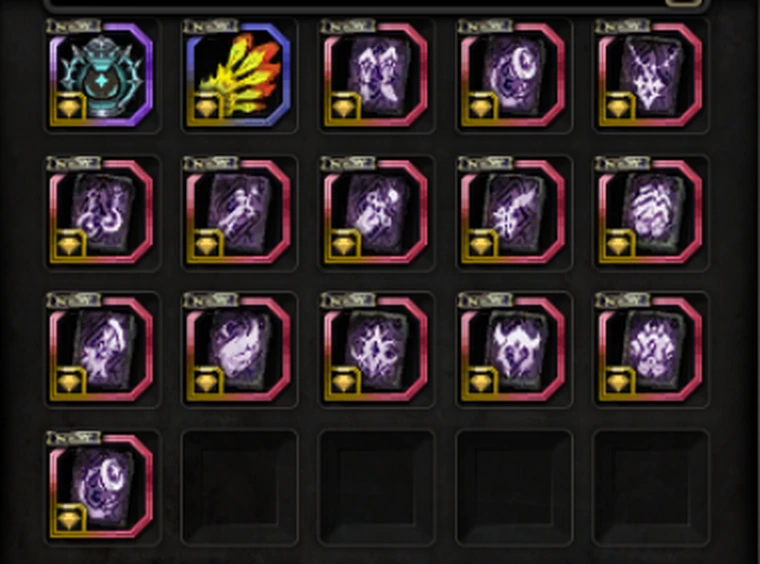
- It will also reward you with Tribal Masks, which you can use to craft Adventurer Crests. Crests are important pieces of loot that directly increase your stats. To craft crests, head to Belin, click Craft Items, then click on Adventurer Crests/Talismans. Here, you will craft the crests of your choice.
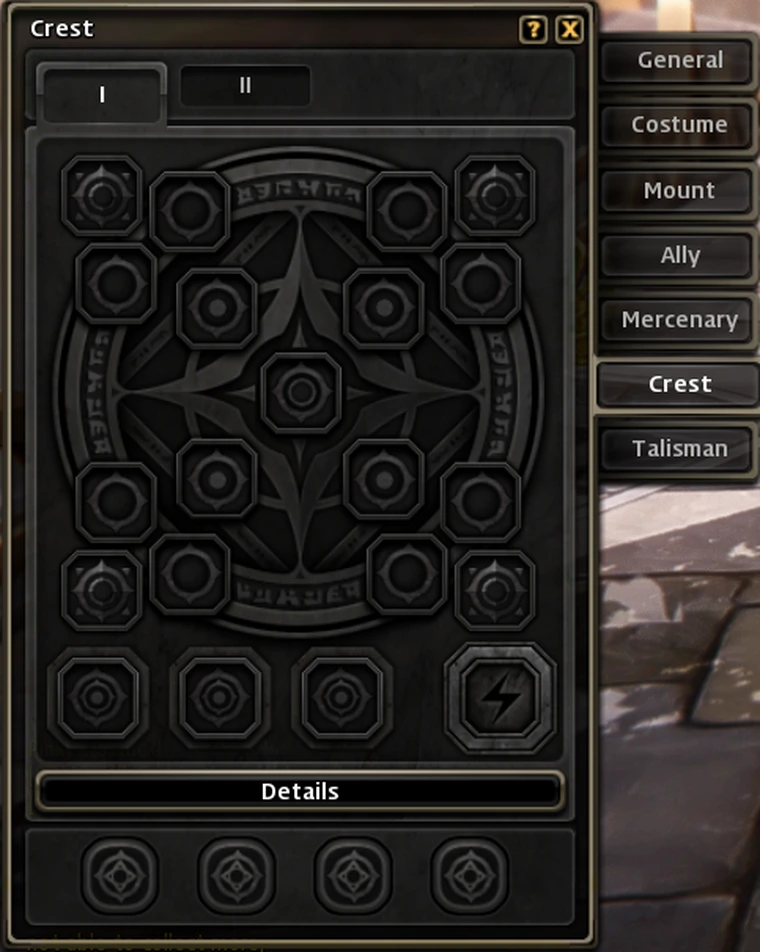
To insert your new crests, simply press P to open your character information screen and click Crest on the right hand side. Right Click the crest you wish to put on, and it will be inserted into any empty slot.
IMPORTANT NOTE ABOUT CRESTS:
There are 10 total options. However, you’ll only need to craft 8 for now.
- Health provides VIT, which gives both hp and defense. An absolute must-have for everyone.
- Life-Giving gives max hp. Everyone loves to have more of that.
- Fierce provides you with extra critical chance and critical damage.
- Ultimate gives you final damage, an additional damage multiplier (worry about this later).
- Defensive just gives you more defensive stats, making you take less damage when an enemy hits you.
- Destructive provides you with Physical damage, similar to the dragon gems mentioned before in the guide. If you use Strength or Agility as your main stat, you will want this.
- Mystical provides you with Magical damage, similar to the dragon gems mentioned before in the guide. If you use Intellect as your main stat, you will want this.
- Windswept provides you with Agility (AGI). While you may not be an AGI class, AGI increases your critical chance, which all classes want.
- Brutal provides you with Strength (STR). Even if you are an AGI class, STR increases your physical damage (albeit a tiny amount) and critical damage so it’s worth getting. However, if you are an INT class, this crest is useless to you.
- Wise provides you with Intellect (INT). Only INT classes will grab this. INT increases your critical damage for INT classes. If you use AGI or STR, this crest is useless to you.
Portal 4: Swindler’s Bay (Dead Man’s Cove)
- This dungeon will teach you about safe zones. The boss will charge up a large, unavoidable attack. When this happens, a green field will appear somewhere around you. Look for it, quickly get inside, and stay in the safe zone until the attack is over. The attack will continue happening until all players in the party dodge the attack.
- Completing this dungeon will reward you with Sapphire Fragments which you can use to upgrade your gear to +15
- You will also be rewarded with a Lavatory Permit, which will be used to craft Talismans. Talismans are just as important as crests for providing you with more stats. To craft these, head to Belin and go to the same tab as you did to make your crests.

IMPORTANT NOTE ABOUT TALISMANS:
Unlike Crests, Talismans want to be placed in a very particular way. Crests can be placed in any slot, but Talismans gain a % bonus based on where they are placed. An example is given here:
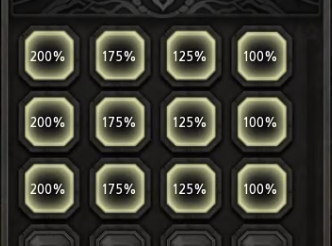
It is important to have the stats that benefit you most on the left side of the page, while the less impactful ones are towards the right.
If you are an INT class, you’ll want the Wise talismans closer toward the left side. The same rule applies to AGI and STR classes slotting Windswept and Brutal talismans toward the left side respectively. Another important one you’ll want on 200% is the Ultimate talisman which grants Final Damage. Here is an example of a fully completed talisman page for an INT class as reference:
When first buying the Talismans, unlike the Crests, you can craft all the talismans at Belin since there are plenty of slots to put them into. Just remember to prioritize your desired stats.
Portal 5: Pen Island (Rowdy Pirate Galleon)
- This dungeon will test every mechanic you have learned so far. Take your time here and remember how to do all the things the previous dungeons taught you. Remember the mechanics won’t stop until you perform them correctly. Check your buffs, jump the stomps, dodge the attacks, hide in safe zones, beat the boss, and claim the final rewards of your starting journey!
- Completing this dungeon will reward you with Diamond Fragments, which you will use to upgrade your gear to +20
- You will also receive Family Jewels, used to finally craft your accessories at Belin (2 rings, a necklace, and earrings). This is where your 2 adaptive gems and 2 attack/elemental gems you crafted earlier come into play.
Congratulations! Starter Zone Completed!
Tips for Mid-Game
Here are some bonus tips to take note of as you set forth the Mid Game content:
- If you are ever confused about what you need to upgrade your gear, here are a few ways to check: read the item description, try enhancing or crafting the item at Belin to see what materials you are lacking (hovering over the item usually tells you where to find what you’re looking for), or check the game reference on Minerva.
- Joining an active guild is a great way to find parties for content. It is very much worth it to try and make friends and find people to play with as you continue your gearing process.
- If you are ever confused about something that is vague or left out of this guide, feel free to ask in discord or in-game. Many people are willing to help when they see someone struggling or confused.
- Lastly, it’s good to note that every class gives two different buffs instead of one. When in a raid party, you’ll want to try to have every buff covered to ensure you and everyone else are dealing the most damage you possibly can. Here is the list that shows which classes give which buffs
| Warrior | ATK% | Max HP% & Healing Power% |
|---|---|---|
| Archer | Crit damage% | Final Damage% |
| Cleric | Max HP% & Healing Power% | Elemental ATK% |
| Sorceress | CDR% | Elemental ATK% |
| Tinkerer | CDR% | Final Damage% |
| Kali | STR/AGI/INT% | CDR% |
| Assassin | Crit damage% | STR/AGI/INT% |
| Lancea | Crit% | ATK% |
| Machina | Final Damage% | Crit% |
| Vandar | Crit% | STR/AGI/INT% |
Mid Game Content
As of now, you are officially past the early stage of your journey. Double-check that you have all of the follow equipped and ready to go:
- Adventurer +20 Weapons and Armor
- Adventurer Accessories
- Adventurer Dragon Gems
- Adventurer Crests
- Adventurer Talismans
Now that you are all ready to go, you may have noticed there are 3 additional portals in the center of the town. These will lead you to different areas of the game filled with new nests/dungeons to continue your gearing journey. However, you will primarily be going into the [Void Gate]. Inside, there will be new portals targeting different areas of your gear.
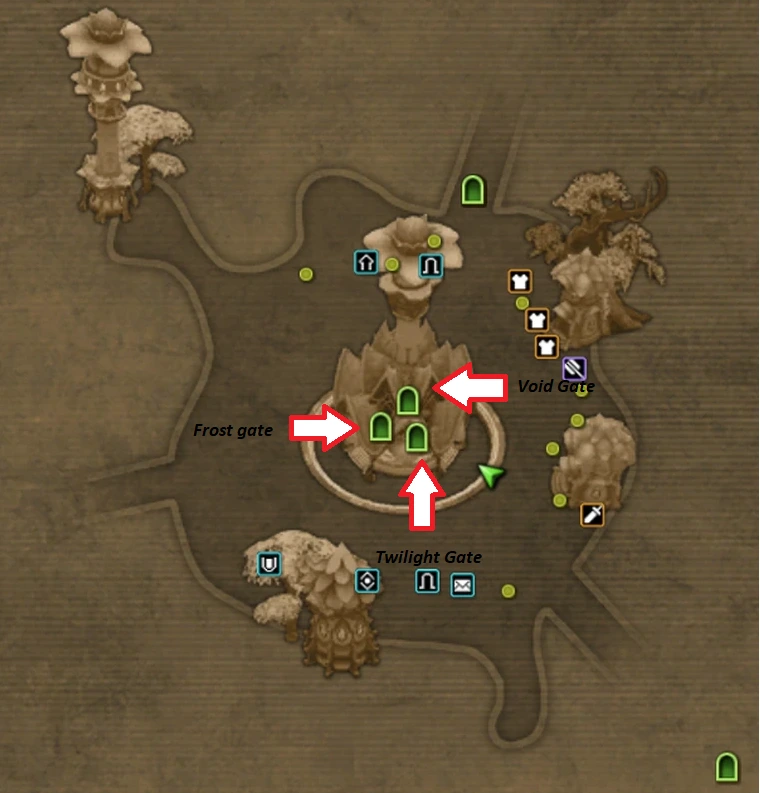
An optional (not required) starting point would be Vein of Sorrows, located in the Frost Gate (Frozen Foothills portal). This nest is equalized, so gear does not matter here. However you will need to have your finished skill build and equipped skill plates from Priest of Darkness Mocha.
Vein of Sorrows can be difficult to complete for newer players of Dragon Nest. However, if you are experienced or feeling confident, it can reward you with a headstart on materials and gold you will need later on down the road. You can obtain the pass required to enter this instance by purchasing Misfortune Pearls at Kaye's Social Credit Shop.
Located in the [Void Gate] are the following portals:
Portal 1: (Mellow Past)
- Blazing Caldera
- Golden Grasslands
- Intricate Valley
The dungeons in Mellow Past drop materials to craft into enhancement materials for your later gear. Each dungeon favors one of the three materials needed to craft your enhancement materials and crafting materials to craft crests/talismans, thus it’s highly recommended to run all three of the dungeons evenly. A good note to know if farming Zephyrs is to run Intricate Valley and save all the villagers (simply clear the area then click on the gates the villagers are trapped in). These dungeons have dynamic balancing, meaning the difficulty scales with party size and class. Even as a healer, you are able to solo them, or run with friends in various party sizes.
Portal 2: (Manic Rift)
- Storm Manticore Nest
- Storm Apocalypse Nest
Next is Storm Manticore and Storm Apocalypse, which have returned with a few twists unique to Project Duck. These nests also drop Astral Crests/Talismans, as well as crafting materials for Astral Gems. Similar to the Mellow Past dungeons, you’ll want to alternate these dungeons to evenly get the materials needed to craft your desired pieces. Expect a few hiccups while you learn the mechanics. Running these for a full set of Astral Crests/Talismans/Gems are recommended before attempting the next step; Rune Dragon Nest. It’s worth noting here that when you replace your Crests/Talisman, the new ones will automatically replace the old ones in the same spot they were previously in. So no need to memorize which spot your talismans were in just to equip the better ones. However, gems will need to be replaced entirely. Shift+Right click your gear, right click the gem inside to take it out, then right click the new gem in your inventory to put it into the now empty slot.
Portal 3: (Gateway to Extinction)
- Rune Dragon Nest 4-Man Normal
- Rune Dragon Nest 4-Man Hardcore
- Rune Dragon Nest 8-Man Normal
- Rune Dragon Nest 8-Man Hardcore
Up next is Rune Dragon Nest 8-Man. After you have your Astral Crests, Talismans, and Gems, along with enough players to make a raid party, it’s time for the raid. This is the end game raid for the first part of EXP4. You’ll want a full party for this nest, as this is where you will grind to gear to +10 Extinction gear (the tier above Adventurer gear). These can also be crafted at Belin. When crafting Extinction gear, you’ll want to prioritize your weapons first, then accessories, then armor. This content is unedited from live servers, so experienced players shouldn’t have much trouble here. It is also relatively easy to learn for newer players who have managed to reach this point in their gear progression. By the time you are done with normal, you should have +10 Extinction gear, as well as Calamity Accessories
Alternatively, if you are unable to find a full 8-man party, you have the option to do the 4-man variant of the nest. This version is easier with some mechanics removed/simplified, but you are rewarded with less rewards compared to the 8 man version. So while this is an option, it will take you longer to get to the next stage of the gearing process, thus you’ll spend a lot of time here.
Once you are done with normal Rune Dragon Nest, it is time for hardcore 8-man. By now you should have +10 Extinction gear, and Calamity Accessories. Be willing to listen and ready to learn the raid, for it gets much harder from here. You will run this until your gear is +20 and your Accessories upgraded to Sinister Calamity. You can get the EXP4 Experienced title here.
Alternatively, just like the normal version of the nest, you can form a 4-man party if there are not enough people for the 8-man raid. You will receive less rewards due to mechanics being removed/simplified. Doing it this way will take longer, thus you’ll be spending a lot of time here.
Portal 4: (Glacial Divide)
- Snowdrift Citadel
Last but not least is Snowdrift Citadel which is a custom made 4-man nest built to challenge players that have finished their Rune Hardcore progression and want to get stronger. There are two custom bosses that you will have to learn to fight. Bringing a healer is strongly encouraged, and you will revive after the first boss. The rewards from here will be used to craft stronger accessories, farm out Expedition Crests, and Gilded Geodes used to upgrade your Expedition Crests.
Side Content
- Black Dragon Nest Time Attack/Desert Dragon Nest Time Attack
- Solace of Oblivion
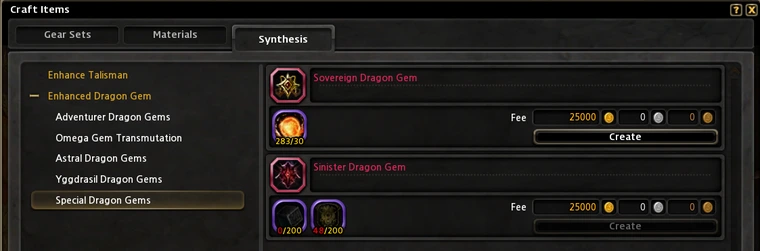
Wrapping your gear up and finishing the EXP4 content will require the final two gems that are placed onto your Head armor and Chest armor. Those gems being your Sinister Dragon Gem, and Sovereign Dragon Gem. All 3 of these Nests are considered Soft Equalized, meaning you are set to EXP4 stats, and given 10% of your current gear’s hp and damage.
BDN/DDN
- Your first stop will be these two raids located in the Timeless Return (Frost Gate). You will need to clear each raid once in order to craft the Sinister Dragon Gem, as well as running those raids multiple times after for the same material to upgrade the gem. Understand that these raids are quite difficult, even for older players, so expect quite a lot of hiccups while you are learning mechanics and be willing to listen to advice from other players. Both raids are 8-man required, so be on the lookout for groups being formed and be patient as they fill up.
- These raids rotate rewards weekly (So if it’s a BDN week, DDN will not drop any loot, and vice versa). It’s a good idea to run that raid multiple times in one week if possible to stock up on the materials while you wait for the other raid to be in rotation.
- This gem can be enhanced up to +15 until you clear Forest Dragon, allowing you to enhance it up to +45.
Solace of Oblivion
- The Solace of Oblivion is located in The Expanse (Frost Gate). This nest is a boss rush/gauntlet format where you will continuously fight progressively stronger bosses. Upon entering the nest and every time you defeat a boss, you will be rewarded with your party leader’s choice of 1 of 3 buffs (you can reroll once to try and get better ones) that will enhance you in some way (such as always hitting high rolls on your attacks, always critting, faster action speed, etc..). After defeating a dragon, you will then gain a chest with very valuable rewards in it used to create a multitude of endgame crests (also known as godlies). You can continue to fight more bosses or optionally leave the nest, however the more you defeat, the more rewards you obtain.
- The reward you will be looking for starts on loop 2 (you can see what loop you are currently on above your minimap). This is when you will start seeing Illustrious Mirrors and Memory Wisps, which are the materials for crafting and upgrading your Sovereign Dragon Gem. This gem can be upgraded to +10 until you clear Forest Dragon, allowing you to enhance it up to +45.
Late Game Content
You can now enter Twilight Bay and clear EXP5 content! This is the newest content in Project Duck and you may need to ask around for help on progression if you're still confused. However, you’ve mostly made it to the end! Hope you enjoyed this guide and we hope to see you in the raids with us.