 Project Duck News
Introduction
Hi everyone, my name is Kyle (Kyle.#4137). I played official DN very briefly, around 70 cap, but have only really played private servers such as Blue DN, Eternal DN, Celestial DN, and now Project Duck DN. Despite only playing private servers, I'd like to say I'm a fairly experienced Dragon Nest player. Big shoutout to Vivid, Vino, and Joorji for their contributions and input on the class and guide. I was one of the play testers for Rai and I hope to help enhance your basic understanding of the class with the experience and knowledge I’ve gained in the past couple months.
Rai is a custom class exclusive to Project Duck that would not have been possible for us to enjoy without our amazing team of developers: Vahr, Joorji, and especially Kozima for working on this secret project for so long. They’ve done an amazing job with Rai and Jotunn and I wanted to show a token of my appreciation to this group of rockstars.
Class and Skills
Rai is a freestyle movement-oriented assassin class that makes use of all of evasive maneuvers in order to stack Charge to execute their big nuke ability. So in other words, if you’re not moving as Rai, then you’re not playing right. This class introduced a brand new bubble system that is different from any other. Movement of any kind (excluding jumping) generates Charge. This means that properly managing your positioning, movement, cooldown timings, and Charge generation will be crucial in succeeding as this class.
I will only be mentioning the skills that Rai actually uses, but feel free to experiment with any skills in the three trees.
There is a LOT of camera movement that can be used to position yourself better
Assassin
[Dirty Trick]: This skill is enhanced by your [CM3] and chains straight into [Roaring Thunder] with a left click input. The skill also generates a good amount of Charge.
[Tumble]: [Tumble]’s cooldown is reduced by .5 seconds as a Rai. If you ever find yourself in a bad situation, never hesitate to use tumble in cohesion with [Flash] because not only is this sequence a decently lengthy iframe, it builds Charge as well
[Preparation]: Assassin’s class buff please use this when rebuffs are necessary for the party or whenever there is downtime between raid mechanics (please..)
[Gore Slam]: If you ever get caught out you can always do the aerial evasion into gore slam combo to quickly get back on your feet
Arashi
[Stigmata]: This skill reduces the elemental resistance of the boss by 20%. [Stigmata]’s last hit also has a surprising amount of range so it is a good option to use when you have no other choice but to attack the boss at mid-range. This skill is one of Rai's few stationary skills. The debuff is applied on every hit, so you can cancel it early with Phase or Hypersonic Step Instant if you want.
[Flash]: A right-click input that can be followed after most actions. This builds a good amount of Charge, especially considering how easily this skill flows with your rotation and how often you are able to cast it.
[Blink]: This is Arashi’s version of illusion step. It's activated by using spacebar following tumble, it builds Charge, and the utility it offers is fantastic. You can use it for gap closing, extending your iframe after [Tumble], or just to generate an extra little bit of Charge
[Decrystallize]: Rai’s version of Brush-Off from the warrior tree. Cleanses debuffs from yourself which is useful in situations where your healer happens to not have a cure.
[Storm’s Center]: A buff skill that you always want to have on. Cast it again every time you get debuffed
[Coil]: This skill is also one of your debuffs. [Coil] decreases the critical resistance of the target by 20% and is a good filler skill. The movement of this skill is great for repositioning. You can turn your camera as you’re moving forward to get more precise positioning.
[Shock Claw]: A filler skill that does great damage. I personally believe there are better filler options but every Rai plays differently and flows their combos in a different way. One thing to note is that this skill keeps yourself in place, so in situations where you need to limit your movement, [Shock Claw] is highly valued. This skill is also fantastic at pushing.
[Tempest]: Another filler skill that I prefer using more than [Shock Claw]. You are able to glide in any direction if you hold a direction while casting which can help with more Charge and dodging boss’ attacks
[Roaring Thunder]: This skill is your [CM3] when combined with [Dirty Trick] and is activated by a left click input following [Dirty Trick]. The non-CM3 cast is ranged, so you can use it to greed during mechs where you're standing further from the boss.
[Overload]: The bread and butter of Rai. On cast, you’ll create an AoE thunder explosion that does fair damage, but at 100 Charge you have the ability to use [Charged Overload] which does way more damage and has an increase in it’s AoE. Due to this interaction, you should never use [Overload] without 100 Charge. The skill also has a decent super armor value so you don’t need to be too worried about it getting canceled if a boss attacks. This skill should always be number 1 on your spread, so being able to cook up combos that generate the most Charge as quickly as possible will be the difference between whether or not you excel on Rai.
[Flash Storm]: A reliable ultimate that does a nice amount of burst damage and generates 40 Charge which is the most out of all your skills. You’re also invulnerable for the entire cast animation. This is nice to use in your opener after [Charged Overload] to maintain insanely high burst DPS. Being able to mix this skill into your rotation is a little tricky since it does not flow the best into your combos but you’re never really losing DPS by casting this skill. Cheating through life threatening mechanics or tanking through boss skills is a very good use of this skill's long iframe.
Rai
[Phase]: A quick retreat maneuver that can either be activated by pressing the skill or hitting spacebar during other actions. It has an iframe and also builds Charge and deals great damage. An overall great filler but just be sure you have a gap closer to use afterward
[Hypersonic Step]: A gap closer and retreat, all in the same skill. Upon the first cast of [Hypersonic Step], you make a swift forward dash wherever your camera is facing. The skill does great damage and generates Charge, but also has an instant version following the first cast that does a backwards dash relative to where your camera is facing. The instant has a pretty generous hitbox and does the same damage as the first cast so it is very important that you try to land both of them. The instant cast is available for a long time after the first cast, so you can hold the instant as an emergency iframe or use it immediately.
[Class Mastery I]: Gives a nice passive damage boost and gives [Storm’s Center] the final damage perk to it. Allows you to build either Strength or Agility as your main stat.
[Class Mastery II]: Decreases your ultimate's cooldown every time you use [Overload].
[Class Mastery III]: [Dirty Trick] is enhanced and now has the option to left click after it to quickly chain into [Roaring Thunder].
[Raijin]: Does great damage and the ending slam portion of the ability is an iframe. You can’t go wrong with this skill. You should use this as soon as it's available as it is one of your highest damaging skills. You are still hittable while invisible until the slam down.
[Thunder Spear]: The skill propels your character backwards and launches a spear towards the direction of your camera. You are iframed during the skill, and also deal a decent amount of damage. The projectile has a surprisingly long range so you can snipe bosses with it if you’re far away.
I-Frames:
[Tumble] / [Flash] / [Blink] / [Hypersonic Step Ins] / [Thunder Spear] / [Flash Storm] / [Raijin] (left click input/ending slam) / [Phase]
Gameplay
Rai is a very swift class that wants to be constantly attacking the boss and has a whole arsenal of skills that allow us to quickly evade attacks and chase bosses while still maintaining our damage.
Here’s one more example of making use of the fluid movement of the class while maintaining damage and evading attacks.
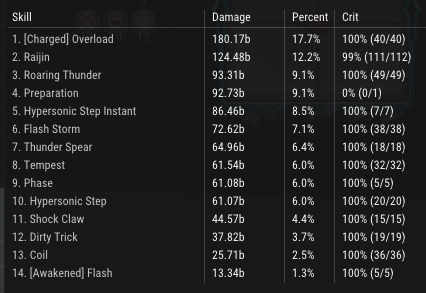
Although Rai is a freestyle type class the main principle for all Rai’s remains the same: building Charge for [Charged Overload] as fast as possible. Maintaining your damage outside of [Charged Overload] is where the skill curve of the class really lies and there are endless possibilities of different combinations of skills and rotations. One thing is for sure though and that is your highest damage abilities: [Overload], [Hypersonic Step], [Raijin], and [CM3] (Dirty Trick + Roaring Thunder). The rest of your skills are filler that are similar in damage for the most part and are differentiated by the utility they offer.
Tips
Hypersonic Step
With a quick rotation of your camera placement, Rai is able to cover a ridiculous amount of ground with just [Hypersonic Step] into [Phase]. You could even mix other movement skills into this to move yourself closer or further to the boss as necessary. Of course this is not always ideal because you won’t always hit the boss with the attacks but this is just an example of the kind of movement you are able to perform with camera rotation.
Another neat thing about this skill is that the second cast of Hypersonic Step cancels you out of most actions you are in the middle of. A good use of this is casting it with [Phase]. Since [Phase] has a long end lag animation, you can cast [Phase], get the hit off, and then immediately cancel the retreating animation with [Hypersonic Step Instant]. I like to swing my camera around during [Hypersonic Step Instant] so I can stay on the boss.
Flash Storm
The animation of the skill is very misleading about the reality of the hitbox. You can rotate your camera backwards or sideways and still land all of the hits of the ability while negating the launch back at the end of the skill
In general, the use of your camera as a Rai can be very useful in order to bring yourself into much favorable positions opposed to moving in the desired way of the skill but these two in particular I find to be very useful.
ALWAYS be moving. If you are not moving you are win trading! Downtime in mechanics is awesome for Rai since we are able to dash around the map to regenerate Charge in order to prepare for a big opener with [Charged Overload] as soon as the boss is hittable again. You can even use skills that grant a lot of charge during this time such as [Coil], [Blink], and [Flash] since they generally don’t do that much damage and have very low cooldowns. Here’s a list of how much Charge is produced for each skill:
Keep in mind that if the full animation does not completely go through, then you will not generate the full value of Charge.
[Dash]: ∞ Charge
[Flash Storm]: 40 Charge
[Raijin]: 15 Charge
[Hypersonic Step] (both casts): 14 Charge
[CM3]: 11 Charge
[Coil]: (including left click): 9 Charge
[Blink]: 9 Charge
[Phase]: 7 Charge
[Dirty Trick]: 7 Charge
[Thunder Spear]: 6 Charge
[Shock Claw]: 6 Charge
[Roaring Thunder]: 5 Charge
[Tempest]: 4 Charge
[Flash]: 4 Charge
[Overload] (please don’t do this): 4 Charge
[Tumble]: 3 Charge
[Stigmata]: 2 Charge
Recognizing and having a general understanding of how much Charge each skill is very essential to getting off [Charged Overload] as often as possible.
Skill Build
Unified Skills: HP Boost, FD Boost
Skill Crests
What’s awesome about the skill crests is that a lot of them are preference. Once you know how you like to play the class you’ll be able to craft your own mix of what you like to have on cooldown or damage. For introductory purposes, I’ll provide a baseline crest combination.
These are listed in priority so if you need to remove a crest or two, start from the bottom of the crest list. Some people will prefer [Coil] over [Tempest] and that’s perfectly fine.
[Overload DMG] / [Dirty Trick CDR] / [Roaring Thunder CDR] / [Hypersonic Step CDR] / [Flash Storm DMG] / [Phase DMG] / [Tempest DMG]
Alternative crest options: [Flash CDR] / [Flash Storm CDR] / [Coil DMG]
Skill up: +1 Overload
Rotation
After the opener, it’s really up to you what you want to do since there is not a set rotation but a good rule of thumb is to be sure you are using: [Overload], [Raijin], [Hypersonic Step], and [CM3] as often as possible.
[Charged Overload] → [CM3] → [Raijin] → [Thunder Spear] → [Hypersonic Step] → [Flash Storm] → [Phase] → [Hypersonic Step Ins] → [Tempest] → [Flash] → [Thunder Spear] → [Coil] → [Charged Overload]
Video provided by Joorji
RUDN HC
Video provided by Vino
TKN Berserk
This isn't too impressive considering how strong the gear is up to RUDN HC patch but is still a decent display of how to make use of your movement and camera positioning as the class