 Project Duck News
Introduction
This guide is a joint effort by @kaelreplica, @yuulgea and @zafz (KaYuZa).
Overview
Defensio is one of the 3 playable tanks in PDN. Defensio gameplay revolves around maintaining your [CM1] buff (Immense SA + 25% DR buff) uptime which allows you to ignore most SA break mechanics in the game while taking reduced damage.
Super Armor (SA): You don’t get interrupted by enemy attacks so you can keep casting skills.
Damage Reduction (DR): You take reduced damage from enemy attacks.
[CM1] buff has 5 seconds duration. Remember to refresh the buff duration before it expires.
How to maintain your [CM1] buff uptime:
- Cast any [Gear Step] skill.
- Use [Trick] to dodge an attack.
- Use [Parry] to block an attack.
Skills
Machina
[Lariat]: Generates 10 [Steam] on hit. Triggers your [CM3] on cast that changes [Taunting Blow] to [Enhanced Awakened Taunting Blow] which can then be casted directly after this skill with {LMB}. You can hold {W} while casting this skill to first charge forward before using {LMB} to start the normal cast animation. You can also use {RMB} during [Fly-by] to cast this skill.
[Body Check]: {RMB} > {RMB} to cast, can be used to access [Ducking] with {Space} after the cast.
[Fly-by]: [Tumble/Dash] > {Space} to cast. Has a short I-Frame on cast. Launches yourself forward above the ground and stops when you hit the ground after a certain maximum distance or after colliding into enemies. During this skill’s animation you can also use {RMB} to cast [Lariat] or use {LMB} to cast [Retro Charge].
[Retro Charge]: {LMB} during [Fly-by] to cast this skill which resets the cooldown of [Fly-by]. Furthermore, holding and releasing {LMB} after you glow red allows you to cast [Fly-by] again.
[Boost]: Main class buff. Gain [Harmonize] Critical Chance +10% and [Boost] Final Damage +10% buffs to yourself and nearby party members for 900 seconds. These buffs can exceed the status caps so make sure everyone in the party gets these buffs and re-buff when necessary.
Patrona
[Ducking]: {Space} during any skill animation while you are touching the ground (except [Fly-by], [Retro Charge], [Boost], [Parry] and [Endure]) to cast which can then be followed up with either {LMB} to cast [Stomp Shuffle], {RMB} to cast [Steam Release] or {Space} to cast [Cycle Kick]. Has a very short I-Frame on cast and generates 1 [Steam].
[Gear Step]: This refers to [Stomp Shuffle], [Steam Release] and [Cycle Kick]. Each [Gear Step] cast refreshes the duration of your [CM1] buff.
[Stomp Shuffle]: Moves you forward while hitting enemies in front. Can be casted actively or through [Ducking].
[Steam Release]: Moves you backward while hitting enemies in front. Can be casted actively or through [Ducking]. Enemies hit by this skill will be affected with the basic +20% Damage Taken Debuff for 20 seconds.
[Cycle Kick]: Lifts you up in the air while hitting enemies in front. Can be casted actively or through [Ducking]. During this skill’s animation you can also use {LMB} to cast Aerial [Beat Down] or {RMB} to cast Aerial [Twister Kick].
[Beat Down]: Ground cast has a shorter animation and deals multiple hits in front, half of the damage is dealt in the last punch. Aerial cast has a longer animation, which can be shortened with {LMB} without losing too much overall damage. Automatically consumes 30 [Steam] when cast to deal double damage and grants I-Frame for the full cast animation.
[Twister Kick]: Ground cast has a longer animation, which can be shortened with {LMB} but the overall damage will be much lower. Aerial cast is more consistent to get the maximum number of hits on various enemy sizes and has a slightly shorter animation. Additionally grants you 20% DR while casting. Automatically consumes 30 [Steam] when cast to deal double damage and grants I-Frame for the full cast animation. Using {Space} at any time during the skill animation before you are about to land on the ground causes you to cancel the skill and flip backward fully I-Framed that lasts until you are about to land on the ground.
[Overclock]: Gain a 30% of target’s HP shield to yourself and nearby party members for 15 seconds. Additionally heals you for 2% of max HP every 2 seconds for 25 seconds. The skill animation end lag can be cancelled immediately with [Ducking] while still gaining the buff. Cooldown reduction does not affect this skill.
[Concussion Blow]: Used for debuffing/dispelling enemies, removing any buffs that they have. Use it when you see a green buff on an enemy. Some buffs cannot be removed but usually they are intended that way and are not lethal to your party.
[Parry]: Blocks an incoming attack which can be cast on both the ground and air. Air cast animation is cancelled when you reach the ground. Successfully blocking an attack will cause you to flip backwards while hitting enemies in front, generating 30 [Steam], gaining a buff that generates 1 [Steam] every 0.2 seconds for 3 seconds (15 [Steam] total) and refreshes the duration of your [CM1] buff. At any time during this skill’s animation you can also use {W,A,S,D}+{LMB} to counter-attack, hitting the enemy in front and lifting yourself higher in the air and towards that direction. Using {Space} after either a successful block or counter-attack causes you to do an additional back flip. You are I-Framed after a successful block backflip animation, after the {LMB} counter-attack and also after the {Space} additional back flip that lasts until when you are about to land on the ground.
[Beyond the Wall]: Ground cast lifts you up in the air but very slowly, air cast is much faster. Generates 5 [Steam] on hit. When the skill hits an enemy with [Taunting Mark], it detonates it to deal 50% additional damage and also generates an additional 5 [Steam]. Triggers [CM2] on hit which reduces the cooldown of [Strike of the Martyr] by 3 seconds.
[Pneumatic Reflex]: {LMB} when you get staggered to counter and hit the ground. This rarely happens if you maintain your [CM1] buff uptime.
[Strike of the Martyr]: Can be used in the air for faster animation. I-Frame on cast that lasts until when you are about to land on the ground. Generates 50 [Steam] on hit and creates a field that lasts for 10 seconds which gives you a 50% DR buff and also generates 1 [Steam] every 0.2s while you are inside the field.
Defensio
[Auto-repair]: Can be used during any animation. Has a short I-Frame on cast. Removes 10 debuffs on yourself and heals 10% of your max HP. Can be casted in air but can only be followed up with [Parry] or [Trick] as other skills cannot be used until you reach the ground.
[Pressure Release]: Gain a 15% Action Speed buff for 900 seconds. Make sure to re-buff yourself after getting debuffed. The skill animation end lag can be cancelled immediately with [Ducking] while still gaining the buff.
[Provoke]: Generates aggro for the enemies in a cone in front of you. Some enemies may resist the provoke debuff and some attacks ignore aggro so there are some enemies that will ignore you even after successfully casting this skill.
[Taunting Blow]: Can be used in air for faster animation. Generates 10 [Steam] on hit. Leaves a [Taunting Mark] on enemies hit by this skill that can be detonated with [Beyond the Wall] on hit. Applies a provoke debuff on hit but has a weaker aggro priority than [Provoke]
[Endure]: Panic button, has I-Frame for 4 seconds on cast. You can only cancel this skill with [Parry] or [Trick]. Cooldown reduction does not affect this skill.
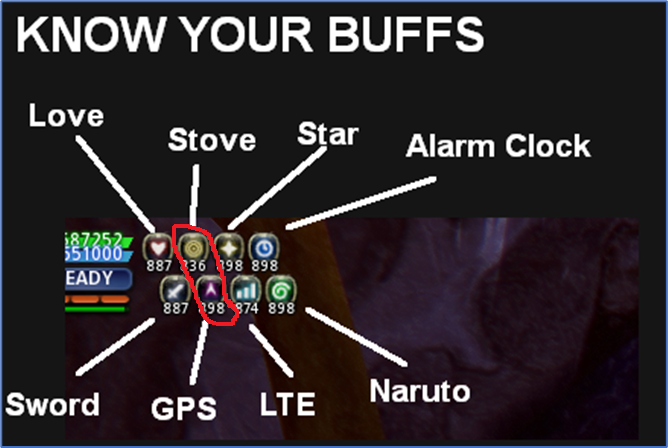
[Class Master II (CM1)]: Gain an Immense SA and 25% DR buff for 5 seconds after any [Gear Step] cast.
[Class Mastery II (CM2)]: Reduce the cooldown of [Strike of the Martyr] by 3 seconds upon hitting enemies with [Beyond the Wall]. [Cycle Kick] will lift you up in the air.
[Class Mastery III (CM3)]: Changes [Taunting Blow] into [Enhanced Awakened Taunting Blow] after casting [Lariat] for 5 seconds. [Enhanced Awakened Taunting Blow] does not share cooldown with [Taunting Blow]. [Enhanced Awakened Taunting Blow] also leaves a [Taunting Mark] on enemies that can be detonated with [Beyond the Wall]. Multiple [Taunting Mark] does not stack.
Awakening
[Trick]: Cooldown can be stored up to 2 charges. Lifts you up in the air and can also be cast in the air. Can be cast during any attack animation. Has I-Frame on cast that lasts until you are about to land on the ground. Holding {W,A,S,D} before casting will lift you towards that direction. Generates 5 [Steam] on cast. If you get hit while in the trick animation and dodge the attack, it generates an additional 10 [Steam], reduces the cooldown of [Strike of the Martyr] by 3 seconds, heals you for 10% max of your max HP and refreshes the duration of your [CM1] buff.
[Ruination]: Can be cast on both the ground and air. The air cast will immediately land you on the ground before doing the same animation as the ground cast. Automatically consumes 30 [Steam] when cast to deal double damage and grants I-Frame for the full cast animation.
Steam Management
Another gameplay element of Defensio is the [Steam] bubble system.
Some skills generate [Steam] while other skills consume [Steam].
[Steam] Management: You can hold a maximum of 100 [Steam]. You lose 1 [Steam] every 0.5 seconds.
Generators: Skills that generate [Steam] upon use, hit, dodge or parry.
- [Lariat]: 10 [Steam] on hit.
- [Ducking]: 1 [Steam] on use.
- [Parry]: 30 [Steam] and gain a buff that generates 1 [Steam] every 0.2 seconds for 3 seconds after a successful parry. (15 [Steam] total)
- [Taunting Blow]: 10 [Steam] on hit.
- [Enhanced Awakened Taunting Blow]: 10 [Steam] on hit.
- [Taunting Mark]: 5 [Steam] on detonate with [Beyond the Wall].
- [Strike of the Martyr]: 50 [Steam] on hit. 1 [Steam] is generated every 0.2s while inside the field created that lasts for 10 seconds.
- [Trick]: 5 [Steam] on use, additional 10 [Steam] after a successful dodge.
Spenders: Spender skills that consume [Steam] to deal double the skill's damage and grants I-Frame for the entire cast animation.
- [Beat Down]: Consumes 30 steam to deal 2x damage and full I-Frame cast animation.
- [Twister Kick]: Consumes 30 steam to deal 2x damage and full I-Frame cast animation.
- [Ruination]: Consumes 30 steam to deal 2x damage and full I-Frame cast animation.
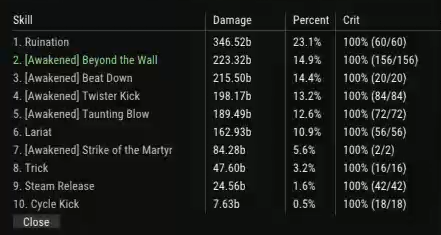
Spender skill priority: [Ruination], [Beat Down/Twister Kick](depending on your skill up crest +1).
Air Casting
Defensio is able to cast most of their skills in the air that usually speeds up the cast time of the skill (except [Beat Down] and [Trick]) but in doing so will reduce the I-Frame cast duration.
Ground cast vs Air cast skills comparison:
- Ground [Beat Down] = Faster animation = Shorter I-Frames.
- Air [Beat Down] = Longer animation = Longer I-Frames. {LMB} to slam the ground immediately.
- Ground [Twister Kick] = Longer animation = Longer I-Frames. {LMB} to fly immediately.
- Air [Twister Kick] Faster animation = Shorter I-Frames.
- [Beyond the Wall] Air cast has faster animation.
- [Strike of the Martyr] Air cast has faster animation.
- [Taunting Blow] Air cast has faster animation.
- Air [Trick] makes you stay longer in the air = Longer I-Frames.
- Air [Ruination] will immediately land you back on the ground before casting the ground cast animation.
- Ground [Ruination] and Air [Ruination] have similar animation times = Same I-Frames.
How to be in the air:
- [Cycle Kick]
- [Parry] > {LMB}
- [Trick]
- Jump {Space} (Duh) (Don’t use this)
I-Frame List
Invulnerability frame (I-Frame): You don’t take damage but you can still get interrupted by certain mechanics.
- [Tumble]/{Shift}+{W,A,S,D} (Duh)
- [Fly-by] on cast until your feet leave the ground.
- [Ducking] on cast >0.5 seconds.
- [Beat Down] with 30 [Steam] full cast animation.
- [Twister Kick] with 30 [Steam] full cast animation.
- [Ruination] with 30 [Steam] full cast animation.
- [Twister Kick] backflip after {Space} that lasts until you are about to land on the ground.
- [Parry] backflip on a successful block, {LMB} counter-attack and {Space} additional backflip that lasts until when you are about to land on the ground.
- [Strike of the Martyr] on cast that lasts until when you are about to land on the ground.
- [Auto-repair] on cast for 0.5 seconds.
- [Endure] on cast for 4 seconds.
- [Trick] on cast that lasts until when you are about to land on the ground.
Skill Build
Unified Skills: [Max HP Boost] and [Final Damage Boost] or [Ultimate Skill Cooldown Boost]
Gems/Jades: 1 of any conversion and 3 Elemental
Skill Crests
- [Lariat] CDR or DMG
- [Beat Down] CDR or DMG
- [Twister Kick] CDR or DMG
- [Beyond the Wall] CDR
- [Strike of the Martyr] CDR
- [Taunting Blow] CDR or DMG
- [Auto-repair] CDR (Optional)
Skill up crest: [Beat Down] +1(recommended), [Twister Kick] +1, or [Beyond the Wall] +1
Rotation Examples
These are the two extreme examples of the opposite ends of the Defensio playstyle. Feel free to make your own skill crest combinations and skill rotations as Defensio gameplay can be very dynamic and freestyle.
“Lazy” rotation: This rotation is more static to play aka “lazy” so it is ideal for beginners to the class. It does not really rely on [Parry] blocks and [Trick] dodges for generating [Steam] during your rotation. Your skill crests will be full DMG. You want to use your current [Steam] by casting spender skills and then use [Strike of the Martyr] before starting the lazy rotation. You will have barely enough [Steam] until you get your next [Strike of the Martyr] off cooldown so blocking once with a [Parry] or dodging once with a [Trick] would ensure you have enough [Steam] during this rotation. Feel free to weave in more [Parry] blocks and [Trick] dodges as you get more familiar with the class.
“Lazy” rotation: [Taunting Blow] > {Spender} > [Trick] + BTW > [Lariat] + [Enhanced Awakened Taunting Blow] > {Spender} > [Trick] + BTW > {Start}
Basic lazy rotation:
Lazy rotation but with opener and air [Taunting Blow]:

“Priority” rotation: This rotation is more dynamic to play and therefore more of a freestyle playstyle. The goal is to block with [Parry] and dodge with [Trick] whenever possible to generate as much [Steam] as you can to spam your “priority” spender skills with 30 [Steam] off cooldown. Your skill crests will be full CDR to help you build [Steam] quickly with [Lariat] and [Taunting Blow] and also have a shorter cooldown on your spender skills. You can also use Unified skill [Ultimate Skill Cooldown Boost] to shorten the [Strike of the Martyr] cooldown.
“Priority” skills in order: [Ruination], [Beat Down/Twister Kick](depending on your skill up crest +1) when you have 30 [Steam] to spend
Tips and Tricks
- Maintain your [CM1] buff uptime by casting any [Gear Step], blocking with [Parry] or dodging with [Trick] every 5 seconds during battle so you can continue to take reduced damage and not get interrupted even if you get hit.
- Chain spam [Ducking] {Space} into [Steam Release] {RMB} to build [Steam] during any downtime. During cutscenes where you can’t cast skills but can still control your character, use {RMB} > {RMB} to cast [Body Check] and access [Ducking] with {Space} and chain into [Steam Release] with {RMB} after.
- Do not be afraid to take damage. If you lose some HP or you have debuffs like poison/burn/slow/sleep/stun/root use [Auto-repair] to heal and cure yourself. You probably have healers as well. Just keep the boss in one place as much as possible.
- Use your [Overclock] shield buff to help you and your party block some damage when they are low on HP. You can also just use it by yourself if you are low on HP to recover your HP slowly for 25 seconds even after the shield runs out.
- Be mindful not to cancel your ground cast skills too early with [Ducking] {Space} as you will lose out on any damage from those early cancelled skills.
- Always try to block attacks with [Parry] as it will generate a lot of [Steam].
- [Trick] can have a deceptively long I-Frame duration if you cast it high in the air as the I-frame lasts until when you are about to land on the ground.
- Remember to dodge attacks with [Trick] as it will make @chrissssssssssssss happy.
- Multiple [Taunting Mark] does not stack so make sure to detonate any [Taunting Mark] with [Beyond the Wall] before casting another [Taunting Blow] or [Enhanced Awakened Taunting Blow].
- You can use [Cycle Kick] to air cast every air castable skill.
- Use [Concussion Blow] to debuff enemy green buffs.
- If you think you are going to die press the panic button [Endure] to be I-Framed for the next 4 seconds.
- You can hold {W,A,S,D} before using [Trick] and [Parry] to reposition in that direction.
- Aerial [Twister Kick] initial animation does not have a directional input, but follows the last movement you do. Example: {S}+[Trick] > Aerial [Twister Kick] will make you stay in place and not move much, this also works with [Parry].
- Use [Fly-by] to quickly reposition and dodge quick mechanics like FDN Dragon Dive.
- You can cast all [Gear Steps] skills through your skill bar.
- You can disable casting of [Cycle Kick] by {Space} > {Space} by going to PDN Settings > Gameplay > Dropdown Input Settings > Check {Patrona - Disable [Spacebar] to use [Cycle Kick].