Project Duck News

Introduction
Self Introduction
Hello everyone. I've been playing Gladiator since 70 cap and Dragon Nest since NA Closed Beta. As the title says, this guide is for PvE ONLY. I also do development work for Project Duck and have been playing on Project Duck since May 2019.
[If you're interested in learning about other classes, we have a Class Guide Archive! - Vino]
Class
So you want to play Gladiator? Gladiator is a fast paced class with low cooldowns and a huge burst skill when enemies are high and low health. In order to play Gladiator efficiently, you’ll need to master the use of your cooldowns and chain your skills very quickly. If you are unable to use your skills efficiently, you’re leaving your low cooldown skills available, thus losing large amounts of DPS. Since your cooldowns are low and the damage on those skills are medium to high, every little second counts towards a huge amount of your overall DPS.
Please note that this class uses many different key combinations and dexterous hand/finger movements (depending on your hotkey setup) and is very taxing on your hands/wrists. If you have any wrist problems such as tendonitis or carpel tunnel, playing Gladiator may be painful.
Skills
I will only be mentioning skills that have at least a little bit of relevance. I will also be excluding non-EX versions of the skills since you should be learning all the EXs and awakening versions anyway.
/\c1\Warrior
[Heavy Slash]: One of your options for your CM3. It's personal preference really but I prefer Destructive Swing over Heavy Slash to dump SP into.
[Destructive Swing]: One of your options for your CM3. It's personal preference really but I prefer Destructive Swing over Heavy Slash to dump SP into. You have an iframe during the jump.
[Brush Off]: Removes most debuffs on cast. It can also be used to cancel skill animations and state changes (such as downed/knocked back/knocked up). When used with [Feint] or [Parry], it can instantly cancel any skill. More info on this combo in the Gameplay section.
[Dash Kick]: This is crucial to your instant skill later. However, you'll want to max it because it decreases the CD of the skill by 1 second at every level which you'll want for your instant.
[Breaking Point]: The party buff that Warrior provides to the team. It’s a great skill to increase party damage so always watch for when this buff is not on your allies.
/\c11\Swordsman
[Triple Slash]: One of your main DPS skills. [Triple Slash] has different cast animations. Each (left or right click) animation has its own perks.
Right click animations tend to keep you in place if you're keen on not moving around too much. The fourth slash of the right click also works as an iframe. The fifth slash can lift you into the air to dodge stomps. However, right clicks have a slower cast time than left clicks. Meanwhile, left clicks move you forward slightly with each consecutive slash. You can use this small amount of movement to dodge attacks such as tracing explosions at Crudelis or anything else.
Due to the various animations, you can be very creative with [Triple Slash]'s use. [Triple Slash]’s cooldown is reset upon successfully landing [Feint] and has a extremely low cooldown as your [Class Mastery I] reduces your main skill cooldowns by 50%. [Triple Slash] has an effective cooldown of 3 seconds.
[Forward Thrust]/[Front Shove]: [Forward Thrust] is a fast casting skill and gets an alternative different cast animation with the Awakening. Simply tapping the skill will make you step backwards and thrust forwards, after the thrust you can left or right click to do another slash. The step backwards works as an iframe and the right click can lift you into the air which allows you to dodge stomp mechanics. You can also skip the backwards step by left clicking.
If you hold S while tapping the skill, you will use [Forward Thrust] in place and compile all the hit spread into a total of 3 hits. The S cast version has a much faster animation. You primarily use the S cast version; only use the tap cast version if you need the iframe or you need to gap-close to move towards the boss. [Forward Thrust] also heals for 3% of your max HP per cast if you hit an enemy. [Forward Thrust] cooldown is also reset upon hitting [Feint] and has very low effective cooldown thanks to that. This means you'll be able to heal 3% of your max HP approximately every 3-4 seconds. [Forward Thrust] has an effective cooldown of 3 seconds.
[Hacking Stance]: Hold left click to continue slashing in front of you. This does a little more damage than the [Triple Slash]/[Forward Thrust]/[Feint]/[Parry] combo. It has a long cooldown so you should only use it when you can make use of most of the cast. Tapping any direction key W/A/S/D dash you in the chosen direction. The dash is useful as an iframe for dodging multiple attacks consecutively (like RDN's Tacticus Dark Room). The right click animation is also an iframe.
[Line Drive]: One of your highest DPS skills and has a low cooldown due to [Class Mastery I] and [Class Mastery II]. You can also double cooldown cut [Line Drive] for optimized DPS (more on that in the Advanced Gameplay section).
You can hold S during the cast to dash forward a small distance instead of the full distance. Most of the time, you will be using the S cast variant of [Line Drive] since it's much easier to land all 4 hits and you won't dash through the boss and into something dangerous such as RDN's Jasmine Wifi or Mine attacks.
After the charge, you can tap right click to chain into [Dash Kick] which will reset the cooldown of [Line Drive] instant and allow you to cast it again immediately. The EX windblades do not hit – this is an intentional feature in Project Duck since they used to lag the boss and delay their attacks. The EX windblades' damage has been compensated onto the charge damage.
[Infinity Edge]: One of the longest iframes in the game. The entire cast of the skill is an iframe, each left click progresses the attack animation. If you press the left click button at a slow pace, it extends the duration of invincibility. The damage of the skill itself is rather low, as it should only be used for its invincibility frames. It can be used to cheat your way through some boss mechanics or high damage skills by becoming invincible and dealing (mediocre) damage at the same time. A good use example is during RDN's Guardian Onion attack, TKN's Gardener's Whirlwind, IDN's Dragon Spin or Kodiak Poison Rain. [Blade Storm] is much better for DPS than [Infinity Edge].
[Dash Slash]: Smooth animation to end your dash sequence. It can also be used to trigger [Line Drive] instant. Doesn’t do high damage, so don’t expect much out of this skill. It also functions as a good pushing skill alongside [Dash Combo]. [Dash Slash] is primarily used for a comfortable transition from dashing. Primarily use [Dash Slash] to trigger [Line Drive] instant.
[Dash Combo]: An extended combo that can be chained into after casting [Dash Slash] by left clicking. Low damage, but good at pushing objects in raids/nests. [Dash Combo] can also trigger [Line Drive] instant. If you Tumble left, right, or backwards and press left click, you will cast [Dash Combo], skipping [Dash Slash].
[Eclipse]: Utility skill. I used to use this as a filler skill in between my skill rotations. However, with the changes to [Hacking Stance], this skill has fallen out of my rotaiton. [Eclipse] is also especially useful for pulling objects in towards you. Every point put into the skill lowers the cooldown. If you still like using the skill, go for it, but since [Hacking Stance] require a lot of points now, I do not have this in my build anymore.
[Courageous Shout]/[Brave]: One of your main buffs that you should keep up 24/7. It increases your attack by 30% for 20 seconds. The awakening also grants 11 stacks upon hitting an enemy or object.
[Aerial Combo]: Useful utility passive for staying in the air longer. This is useful for giving yourself extra air time to dodge stomp attacks. You can also further increase your air time by spacing out each click/slash. Upon landing on the ground, you will also be in a very long iframe (approximately 1 second).
[Parry]: It cancels every single skill except for [Hack Stance] and [Coup de Grace] in the aerial state. Any skill that can be canceled with [Feint] can also be canceled by [Parry](ing). Can be used with [Brush Off] the same way as [Feint]. [Parry] only blocks a single skill and gives the user an iframe after successfully blocking an attack. The iframe at the end technically allows you to dodge more than one skill. It can be used to dodge stomps and gives a bigger cushion than most iframes as [Parry]'s duration of safety is longer since it function as a block and iframe. However, similar to other blocks in the game, any attacks that give a debuff such as burn or poison will still be applied on you despite a successful [Parry]. This can be countered by using [Brush Off] after [Parry] successfully blocks an attack. You can also left click to cancel the [Parry] stance early and immediately counterattack. [Parry] for Gladiator is especially useful as it deals significant damage, is used for animation canceling, and has a low cooldown.
[Counter Cross]: Basic counter skill can be used whenever you’re attacked mid air or knocked up. Should be used whenever your [Aerial Evasion] is on cooldown. After casting this skill, your character will do a minor hop which causes you to float in the air a little longer than if you just used [Aerial Evasion], thus increasing your air time. The cross itself doesn’t actually do any notable damage.
[Luring Slice]: Your main debuff which increases the damage taken by enemies by 20%. [Luring Slice] is separated into two slashes – the initial and final. Both the initial and final hit apply the debuff, and since the skill has rather low damage, [Luring Slice] can be canceled after the initial hit. This gives you more time to DPS with your other skills. It deals rather mediocre damage; I would not recommend using the full cast unless you have absolutely nothing better to do.
[Blade Storm]: Much stronger than [Infinity Edge]. It is not worth casting the entire skill unless you are forced to be at a range. You’re much better off throwing the Great Wave (by left clicking) immediately and using your other DPS skills while it is in the air than doing the full cast to get the explosions that come from the ground.
/\c23\Gladiator
[Feint]: Your bread and butter, one of the best skills of being a Gladiator despite its dull animation and mediocre damage. Can be used to cancel any skill except [Coup de Grace] while in the aerial state. [Feint] resets [Triple Slash] and [Forward Thrust]'s cooldowns. Has an effective cooldown of 3.5 seconds thanks to [Class Mastery I]. [Feint] also functions as an iframe during the inital backwards step swing of the animation.
[Coup de Grace]: Your highest damage skill, and the skill Gladiator is most known for. This skill demolishes enemies that are at low or high health depending on which version you use. The regular version has a average base damage but increases its damage even further for every 1% HP under 50% that the enemy/boss has. For the [Class Mastery III] variant, it has a faster cast and deals increased damage for every 1% HP above 50% that the enemy/boss has. This means that Gladiator has peaks and dips in terms of their DPS over the course of the boss fight. As the boss closes in towards 50% HP, [Coup de Grace] will deal significantly less damage. The skill animation jumps you into the air which can be used to dodge stomps. The regular variant has a small tackle forward which you can use to micrododge enemy attacks or position yourself before landing.
[Class Mastery I]: The most important passive. Maxes out at 20 stacks and is the main buff that you play around when conducting your combos. You gain one stack for every successful attack, but there is an internal cooldown of 0.3 seconds. This means that if you are attacking very quickly, you will not generate stacks faster than 1 per 0.3 seconds. At max stacks, the cooldown of [Triple Slash], [Forward Slash], [Line Drive], and [Feint] are cut in half. Stacks are easily gained through [Courageous Shout]/[Brave] and skill usage. This makes your main skills have short cooldowns, which is the main reason why Gladiator is hard to play. Not utilizing your cooldowns effectively leads to lost DPS. More information on how to maximize efficiency with this buff under the Advanced Gameplay section. Here are the cooldowns of the primary skills while affected by [Class Mastery I].
- [Triple Slash]: 6 seconds
- [Front Shove]: 6.5 seconds
- [Line Drive]: 13.5 seconds
- [Feint]: 3.25 seconds
[Class Mastery II]: Allows for the usage of [Instant Line Drive]. [Instant Line Drive] shares a cooldown with regular [Line Drive]. Treat [Instant Line Drive] as the same skill; however, it is casted instantly - meaning there is no wind up time to the charge. [Instant Line Drive] can be triggered by [Dash Slash], [Dash Combo] or [Dash Kick]. [Dash Kick] resets the cooldown of both [Line Drive] and [Instant Line Drive].
[Class Mastery III]: Use [Heavy Slash] or [Destructive Swing] to quickly chain into [CM3 Coup de Grace] to do more base damage at the expense of not being able to do any execution damage.
[Feint Mastery]: Learn this skill if you like to trigger [Feint] using your space bar.
[Hyper Drive]: Dash forward up to four times by tapping the skill and left clicking up to four times. Alternatively, you can right click at any point to unleash a flurry of slashes. You can tap the skill, dash twice by left clicking 2 times and then right click to still unleash a flurry of slashes. The overall damage is the same no matter what point you use the flurry of slashes. To maximize DPS, immediately use the right click after tapping the skill.
Left Click Variant: It is also worth noting that [Hyper Drive] is separated into 3 hits, every dash. The first hit deals most of the damage. The other two hits are a smaller portion, but are still relevant. These are applied at the end of the dash. You would need to hit the boss with the tip of the dash to land all 3 hits. The 2 small hits applied at the end of the dash average to about 13.9% of the full board damage.
If you tap the skill and don't left or right click, you will remain in a readying stance. You can stay in this stance until you decide to left click or right click. While in the readying stance, the cooldown of the skill continues to recover. You can make use of this by remaining in the readying stance to wait for the boss to return from an invulnerability phase (such as RDN's Barbados bridge jump if you get across the bridge early). This skill, like Coup de Grace, consumes 15 stacks.
[Side Dodge]: The skill can be casted similar to how [Parry] and [Feint] can cancel skills. You cannot cancel [Line Drive], and the midair portion of [Coup de Grace]. [Side Dodge] can be used to cancel most skills by holding a directional key and pressing right click in the middle of casting any other skill. This skill is great for moving your character out of the way of attacks quickly without using Tumble; however, it is not an iframe. The use applications of [Side Dodge] are almost endless.
I-Frames
- [Tumble] (duh)
- [Destructive Swing] Lv 6 (during the initial leap)
- [Triple Slash] (fourth slash, right click)
- [Forward Thrust] (non hold-S variant, jumping backwards animation)
- [Hacking Stance] (during and W/A/S/D dash and right click end animation)
- [Line Drive] (during the hits, literally never attempt this. It's only like 10 frames)
- [Infinity Edge] (the entire animation)
- [Parry] (after a successful parry or left click)
- [Aerial Combo] (after landing)
- [Feint] (initial back-away slash)
Filler Skills
These are skills that get used in between main rotation when things are on CD. These skills have low priority.
- [Eclipse]
- [Heavy Slash] (only if boss is under 50% HP)
- [Destructive Swing] (only if boss is under 50% HP)
Pushing/Pulling Skills
These are skills that are good for pushing mechanic objects in raids and nests
- [Dash Slash]/[Combo]
- [Triple Slash] left clicks
- [Forward Thrust] non-S variant
- [Side Dodge] forward
- [Eclipse] (used for pulling objects towards you)
Skill Build
Gladiator has a fairly simple build path as most of the skills are obviously more useful than others. There's some options you can take and you definitely don't have to follow mine strictly. You can take points out of [Heavy Slash] to put into [Destructive Swing] and/or [Eclipse] if you want but I personally never use those anymore.
Skill Crests
- [Triple Slash DMG]
- [Forward Thrust DMG]
- [Line Drive CDR]
- [Coup de Grace CDR] (Can be CDR or damage, but I prefer CDR)
- [Hacking Stance CDR]
- Optional - [Feint DMG]
- +1 [Coup de Grace]
Gameplay
Basic Gameplay
Gladiator puts strong emphasis on constant attacks and aggressive gameplay. This means that you’ll be melee range of the boss all the time constantly attacking. Any time not attacking besides doing a invulnerable boss mechanic is wasted DPS. This includes dodging. You have high damage on your blocking, dodging and or iframe skills: [Feint], [Parry], [Front Shove] and [Side Dodge]. Skills should be casted quickly with little time between each click as you need to make the most of your DPS. Many other classes have skills with longer cooldowns but deal more overall damage. In order to compete with those classes, you'll need to maximize the usage of your low cooldown skills.
You should not save [Feint], [Parry] and [Front Shove] exclusively for iframing attacks as they deal high damage. These should be used while DPSing, since they have low cooldowns, it is extremely unlikely that you will not have an iframe, block, or other mobility skill ready for an incoming attack. You also have [Side Dodge] to throw yourself out of harm's way. Gladiators have an insane number of iframes and mobility. Here's an example:

Gladiators focus around dealing high amounts of damage with [Triple Slash], [Forward Thrust], [Feint], [Parrying], [Hacking Stance], and [Line Drive] until [Coup de Grace] is available. With low CDs skills like [Parry], [Eclipse], [Feint], [Triple Slash], and [Forward Thrust], and the CD resetting of [Triple Slash] and [Forward Thrust], you'll be able to pull off the basic infinite combo. View the demonstration video:
Advanced Gameplay
Gladiators have a lot of possible play styles - kinda like skateboarding. While everyone has their own style, there are still fundamentals rules that everyone follow generally follows. That fundamental rule is constant aggression and attacking the boss.
Gladiators have many skills that can move them around the battlefield. You can use [Triple Slash], [Front Thrust], [Line Drive], [Hyper Drive], [Side Dodge], and [Hacking Stance] to dodge around quickly and maneuver around and towards bosses. You would want to use these to maneuver and deal damage at the same time. Once a Gladiator learns how to use their skills effectively to dodge and chase the boss, they’re going to find themselves using Tumble and Dash less.
View post on imgur.comFiguring out when the boss is invulnerable or not during or in between mechanics are incredibly important to DPS. When the boss is vulnerable, you should always be doing something. Gladiator as a class requires high actions per minute. Although there are cast times and delays left after casting the skill, there is almost always room for improvement to minimize those times. One thing to keep in mind is to try and use your skills the moment they are off cooldown with priority on the harder hitting skills such as [Line Drive], [Coup de Grace] and [Hyper Drive]. Priority skills in order are [Coup de Grace], [Hyper Drive], [Line Drive], [Hacking Stance], [Parry], [Front Shove], [Triple Slash], [Feint].
Left click [Hyper Drive] is an extremely tricky skill to make the most of and you should stick to the right click cast variant most of the time. [Feint] and [Parry] can be used to cancel the delay that occurs at the end of casting [Hyper Drive] and [Coup de Grace]. [Brave] allows you to use [Hyper Drive] and [Coup de Grace] off cooldown easily.
Learn to use [Side Dodge] - it is an amazing tool once you get the hang of it. From what I notice, not many Gladiators make use of [Side Dodge]. However, using this tool can be beneficial for dodging attacks and moving around or towards the boss to gap-close. Tl;dr if you aren't constantly abusing your mobility and tools, you aren't playing Gladiator right.
See the videos:

The Golden Rule: LD Double 50% CD Cut
This deserves its own section since so many people don't know this exists. Understanding Gladiator's [Class Mastery I] allows you to maximize DPS to a whole new level. Every time you hit max stacks (20), the cooldowns of your primary skills are cut in half. If you use some stacks to cast [Coup de Grace] or [Hyper Drive], and get back to max stacks again, your cooldowns are cut in half again.
In this case, the skill we're going to be focusing on is [Line Drive]. [Line Drive] CD is normally 27 seconds. When you cast [Line Drive] at max stacks, your skill cooldown is going to be 13.5 seconds (without CD reduction skill plate). Using [Hyper Drive] or [Coup de Grace] and then [Courageous Shout]/[Brave] right after and landing some attacks after will put you back at 20 stacks, thus cutting the 10 second cooldown of [Line Drive] (since it takes time to cast those skills) AGAIN to approximately 4 seconds.
You can do this with every cast of [Line Drive] if you rotate between [Hyper Drive] and [Coup de Grace]. Here's an example:
Dash Slash --> Line Drive INS --> Dash Kick --> Line Drive INS --> Hyper Drive --> Courageous Shout --> Forward Thrust/Triple Slash combo
If [Hacking Stance] is off cooldown, you should use [Hacking Stance] instead of the Forward Thrust/Triple Slash combo
This means you should NEVER use [Courageous Shout], [Coup de Grace], or [Hyper Drive] BEFORE [Line Drive] (unless you're in a short DPS window). Any time that you don't spend losing and gaining stacks is DPS lost from not efficiently double 50% CD cutting [Line Drive].
Rotation Video
This class requires a lot of dedication and practice in order to play efficiently. This class puts out results based on the effort you put in. I may update this guide occasionally to include new information if I find more or if Project Duck updates Gladiator in a major way.
Tumble (A/D/S) --> [Dash Slash] --> [Side Dodge] (W) --> [Luring Slice] --> [Parry] --> [Line Drive (Instant)] (S) --> [Dash Kick] (right click) --> [Line Drive (Instant)] (S) --> [Heavy Slash/Destructive Swing] --> [Coup de Grace] --> [Courageous Shout] --> [Forward Thrust] (S) --> [Triple Slash] (left/right click) --> [Feint] --> [Forward Thrust] (S) --> [Triple Slash] (left/right click) --> Tumble (A/D/S) --> [Dash Combo] --> [Parry] --> [Line Drive (Instant)] (S) --> [Dash Kick] (right click) --> [Line Drive (Instant)] (S) --> [Hyper Drive] (right click) --> [Courageous Shout] --> [Forward Thrust] (S) --> [Triple Slash] (left/right clicks) --> [Feint] --> [Forward Thrust] (S) --> [Triple Slash] (left/right click) --> Repeat from the beginning
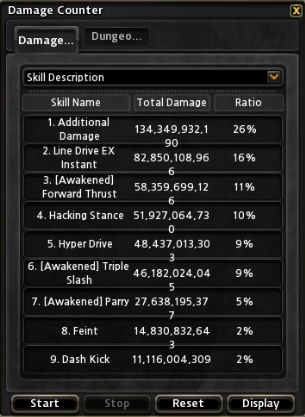
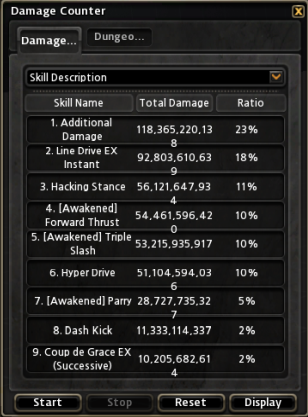
DPS Spreads
Here's a small collection of DPS spreads that you should have something similar to if you follow my guide. Your Hacking Stance, Triple Slash, and Forward Thrust should all be within 2-3% of each other.