 Project Duck News
Introduction
Hello, my name is Eledven, and although I have not been playing PDN for very long, I have a lot of experience playing Dragon Nest itself. I play many classes, but my favorites are Sharpshooters and Elementalists. However, my endless love is only for Warden, especially after the rework. This mistress of arrows is what we will talk about today. I want to share a little of my experience and understanding of Warden and hope that this will help players who want to play this class. Let's start a gradual dive into the basic mechanics of the class.
Legend
- [Trace] - is your bubbles
- [Shards] - are your debuff stacks
- [GM] - [Guided Missiles]
- [Core] - Extension Core, an important part of your kit
- CM- Class Mastery
- ! - Important mark, failure to follow the marked item can greatly affect your gameplay
- CD - Cooldown
- CDR - Cooldown reduction
- BTG - Battle Training Ground
- RMB - Right Mouse Button
- LMB - Left Mouse Button
А little about skills: after the Warden rework, many skills have undergone both minor and significant changes. Some skills now have a version with and without a [Core].
Archer
- [Magic Arrow]: The normal version is the same as normal, but when activated in the [Core], in addition to the main arrow, more arrows appear above the center of the [Core], which deal damage over time. Each hit grants 1 [Trace] up to a maximum of 4.
- [Fury of the Owl](!): Your class buff, that grants Final Damage (10%) and Critical Damage 10%. if someone asks you about rebuff - do it please ♥.
Sharpshooter
- [Frag Arrow]: The regular version hasn't changed much, but it’s important for getting [Trace]. Full hits in one target usually grant you 10 [Trace] (single target). However, if you aim at the ground near the target, you can get up to 14. If you press RMB with at least 50 [Trace], you’ll shoot an additional arrow and mark the hit target with a [Core].
- [Swift Shot]: The normal version has a WASD movement and requires melee range to deal maximum hits. Casting [Swift Shot] while in [Core] causes more arrows to shoot out from the center of the core, guaranteeing hits at any range. Both versions stack [Shards] on hit targets and their number depends on the arrow hits: 10 regular and 22 in [Core] version. During the windup of the cast, you are also invulnerable. In both versions, you can press LMB to chain into [Vault] and [Guided Missiles].
- [Rapid Shot]: Shoots piercing arrows out in front of you. Each hit grants 1 [Trace] up to a maximum of 15. This skill is essential to generating enough [Trace]. Targets hit are also debuffed with a -20% critical resistance reduction.
- [Guided Missiles]: The normal version shoots many arrows in a spread in front of you. The hit count varies depending on the size of the enemy and how far away you stand. While the [Core] is active, all arrows automatically target the main boss. Both versions can be cast in the air. Each hit stack 1 [Shard] on enemies up to a maximum of 36.
- [Shattering Shot]: Fire an arrow that explodes on contact with the enemy and splits into many homing arrows. Each hit stacks 1 [Shard] onto hit enemies.
- [Tumbling Shot]: Long iframe that also puts you into the air. Increasing the level also decreases the cooldown.
- [Fake Shot]: You can take it if you want, but I can't say that I use it often. This can also increase the duration of your [Tumble] iframe if you time it correctly.
- [Aerial Chain Shot]: Great for extending your airtime and evading stomps.
- [Walking Target]: Generic debuff that increases enemy damage taken by 20%.
- [Hawk Ballista]: Damage is dealt in a straight line in 2 stages, first the straight hit and then the arrows from above (yes, it's not a big bada-boom anymore, but the skill hasn't gotten any worse from that).
- [Longbow and Crossbow Mastery] - Increase your range and damage when using weapons. Just take it, it’s free damage.
- [Sylph’s Aid]: Permanent 15% MATK increase! Use it.
Warden
- [Detonating Arrow](!): has been completely changed and is now used to detonate Shards through RMB for 50 [Trace].
- [Ward of the Spirits]: this passive is placed in [CM1] and starts working when you leave the city.
- [Class Mastery II]: Replaces old [Stunning shot] with [Shattering Shot], and also resets the cooldown of [Frag Arrow] when [Shattering Shot] hits. This allows you to cast [Frag Arrow] → [Shattering Shot] → [Frag Arrow] for tons of [Trace] while your [Core] is not active. While in [Core], this combo also does a fair bit of damage.
Awakening
- [Cannonade]: Enter a stance and let you aim where to drop a magical bombardment. Does high damage. While in [Core] this skill automatically casts on top of the [Core], and has a faster cast time and lower CD. You should use this as often as possible in [Core].
- [Vault]: Launches you into the air and shoots 3 arrows. Can also be used in the air but you won’t jump another time. This can also chain into [Guided Missiles]. Also give you 12 [Trace].
- [Magic Trace](!): this passive skill gives you [Trace] and [Shards], and is also the main mechanic of the entice class which will be written about below.
- [Sylph’s Core](!): this passive gives you [Core], which changes your skills and increases their damage, and changes sylphs aid to endless buff.
Unified skills
- Max HP and FD boost, Ult Cooldown.
Skill Build
You can distribute all remaining points as you wish. For some reason [Tumbling Shot] isn't here but you should take it.
Gameplay & Rotations
Trace & Shards
Now let's move on to more complex things. At first glance, [Trace] and [Shards] look like two different mechanics, but they are interconnected. The explosion of the [Shards] itself is the main damage of Warden, and the [Core] is a tool for faster and more comfortable accumulation of [Shards] and simply comfortable damage dealing.
[Trace] and [Shards] are collected depending on your ability to hit with all arrows from skills.
Example: in [GM] the maximum arrows are 36, and if you miss or the boss dodges some of the arrows, then there will be exactly as many [Shards] on the target as you hit with. When using the [Core], you will always hit with all 36 arrows.
- [Shards] are a debuff that can stack on the boss, which you can "blow up" for 50 [Trace] using [Detonating Arrow]. They have a set duration but won’t completely expire when the timer is up. They’ll slowly decay once that duration is up.
- The [Core] is a zone that enhances some skills and makes them homing in the center of the core and also costs 50 [Trace] (it is important to hit the enemy with the [Core] itself, so that the core does not attach to the textures of the location!). You can place [Core] by pressing RMB and then using [Frag Arrow].
Your priority is to accumulate [Shards] on the enemy as quickly as possible and explode them. The more accumulated on the boss, the more damage the detonation does. You’ll ideally want to detonate when the boss has 120 stacks, but anything over 100 is fine. The better you maintain a balance between the use of the [Core] and [Shards] - the greater your damage. To do this, you need to remember which skills and how many [Trace] and [Shards] can give when hitting with all arrows, so here's some help for you:
- Prioritizing for getting [Trace]: [Rapid Shot] max 20 → [Vault] max 12 → [Frag Arrow] 10→ [Magic Arrow] max 4
- Prioritizing for getting [Shards]: [GM] max 36 → [Swift Shot(Core)] 22 → [Shattering Shot] 18 → [Swift Shot] 10
But that's not all, because Warden requires knowledge of bosses since they can cleanse themselves and remove the [Core] during certain mechanics! Be careful, and do not waste [Trace] on the [Core] right before the boss clears. It is also important to detonate [Shards] before a long boss mechanic (for example FDN, there is a DPS check at the second stage, and ghouls on the dragon, detonate [Shards] before these mechanics). Warden is a class that does not forgive you for mistakes in using [Shards] and [Trace], and you will need extensive knowledge of bosses and good instincts to deal maximum damage.
- Be careful! Exploding [Shards] does not deal damage during any DPS check (blue bar). during this time you can simply place a [Core] and deal damage, stack [Shards], and when the DPS check ends - detonate them.
Crests and Gems
- [Hawk Ballista] CDR(!)
- [Guided Missiles] DMG(!)
- [Swift Shot] DMG(!)
- [Rapid Shot] DMG(!)
- [Detonating arrow] DMG
- [Frag Arrow] DMG
- Skill-Up Crest – [GM]
Dragon Gems: 1 element converter, 3 elemental damage.
Rotation and Spreads
Warden is pretty flexible in rotation, and some of the skills there are just filler, albeit with acceptable damage. Everyone can find a convenient rotation for themselves, the main thing is to follow the 2 main combos: [Swift Shot] → [GM] – main DPS combo and [Frag Arrow] → [Shattering Shot] → [Frag Arrow] – good for getting [Trace]. Everything else is situational things that you use on cooldown. But I also know that there are people who simply find it difficult to do this on their own, so I will give my basic rotation.
Rotation with full Trace: [Hawk Ballista] → [Swift Shot] → [Vault] → [GM] → [Frag Arrow] → [Shattering Shot] → [Frag Arrow(RMB)] → [Magic Arrow(Core)] → [Cannonade(Core)] → [Swift Shot(Core)] → [Vault] → [GM(Core)] → [Rapid Shot] → [Frag Arrow(Core)] → [Shattering Shot] → [Frag Arrow(Core)] → [Detonating Arrow(RMB)] → [Magic Arrow(Core)] → [Swift Shot(Core)] → [Vault] → [GM(Core)] → [Rapid Shot] → [Magic Arrow(Core)] and continue from ballista, but don’t forget to look at the shards on boss and Use [Detonating arrow] for damage. Also, you should cast [Magic Arrow] without [Core] too, it's free bubbles.
Rotation without [Trace] stays the same until you place the [Core], then it is placed – Continue combo from [Magic Arrow(Core)]
- Tip: skills enhanced by the core have a separate CD from regular skills
Feel free to experiment and change the order in rotation as you like, over time you will understand what and in what order is best to use.
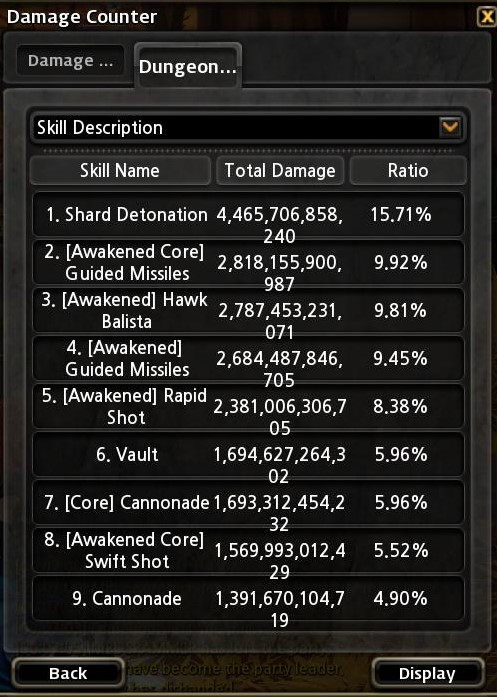
Spread for FDN
Afterword
Warden is a fairly complex and difficult class. You will need time and effort to master it. You won’t always be able to apply the perfect rotation and some bosses will require you to make not always obvious decisions. But all such opportunities and understanding of the character come with experience, and experience is gained only during the game. I wish everyone good luck in mastering this class, I hope my guide was at least somewhat useful.